

Creating and Managing Groups, Roles, and Directories
- Groups organize users with similar permissions (e.g.,
admin,developer,analyst) - Roles define permission bundles for specific services (e.g.,
conda_store_admin,jupyterhub_developer) - Scopes are fine-grained permissions attached to roles (e.g.,
read:users:name) - Create roles → Assign to groups → Add users to groups → Users must log out/in for changes to take effect
- Group directories in JupyterHub require the
allow-group-directory-creation-role(since version 2024.9.1)
Overview
Section titled “Overview”Groups are a fundamental and vital part of the Nebari ecosystem. They are used to manage access to a wide range of services within Nebari, including JupyterHub instances, Keycloak realms, Conda environments, and computing resources. By grouping users based on roles, projects, or departments, Nebari simplifies the management of permissions and resource sharing.
Beyond managing access, groups play a crucial role in organizing and sharing data across the JupyterHub ecosystem. Each group can have its own shared directory within JupyterHub, allowing users within the same group to collaborate seamlessly by sharing files and resources. This facilitates team collaboration and ensures that data is organized and accessible to those who need it.
In this document, we will cover:
- Understanding Roles, Groups, and Scopes
- Managing Groups in Keycloak
- Default Clients, Groups, and Permissions
- Creating Custom Roles with Scopes
- Managing Users and Group Membership
- Managing Group Directories in JupyterHub
- Permission Precedence and Troubleshooting
Understanding Roles, Groups, and Scopes
Section titled “Understanding Roles, Groups, and Scopes”Nebari uses Keycloak to manage access for core services like jupyterhub and conda-store. Access is expressed through three related concepts:
- Roles: Named permission bundles for a specific client/service (e.g.,
conda_store_admin,jupyterhub_developer). Roles define what actions can be performed. - Groups: Collections of users who should receive the same roles (e.g.,
admin,developer,analyst). Groups aggregate users with similar responsibilities. - Scopes: Fine-grained permission strings attached to roles (e.g.,
read:users:namefor JupyterHub, oradmin!namespace=analystfor Conda-Store). Scopes are the actual permissions. - Components: Specifies the service that a role's scopes apply to (e.g.,
jupyterhuborconda-store).
Permission Flow: User → Group → Role → Scopes → Permissions
Nebari ships with default clients, groups, and roles that cover most needs. When you need more granular control, create custom roles with specific scopes in Keycloak and assign them to a group (or directly to a user).
Default Clients, Groups, and Permissions
Section titled “Default Clients, Groups, and Permissions”A fresh Nebari deployment comes with several custom Keycloak clients (services) enabled. You can manage these from Clients in the Keycloak admin console:
clients: - jupyterhub - conda_store - grafana (if monitoring is enabled) - argo-server-sso (if argo is enabled) - forwardauthTo manage and configure these clients, you can navigate to the Clients tab within the Keycloak admin console, as illustrated in the image below.
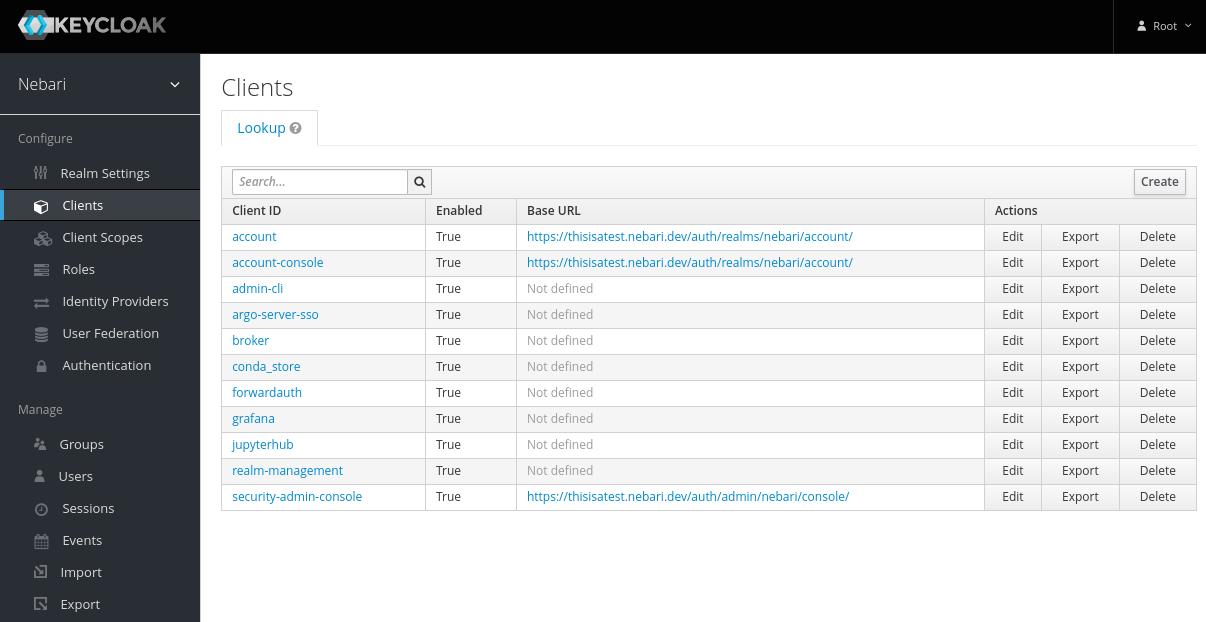
This can be accessed at <nebari-url>/auth/admin/master/console/#/realms/nebari/clients
Default Groups and Their Roles
Section titled “Default Groups and Their Roles”Groups represent a collection of users that perform similar actions and therefore require similar permissions. By default, Nebari is deployed with the following groups: admin, developer, and analyst (in roughly descending order of permissions and scope).
Roles on the other hand represent the type or category of user. This includes access and permissions that this category of user will need to perform their regular job duties. The differences between groups and roles are subtle. Particular roles (one or many), like conda_store_admin, are associated with a particular group, such as admin and any user in this group will then assume the role of conda_store_admin.
Default Roles and Permissions
Section titled “Default Roles and Permissions”Below is a table that outlines the default roles, groups, and permissions that come with Nebari:
| Resources | Roles | Permissions |
|---|---|---|
|
|
|
| Resources | Roles | Permissions |
|---|---|---|
|
|
|
| Resources | Roles | Permissions |
|---|---|---|
|
|
|
| Resources | Roles | Permissions |
|---|---|---|
|
|
|
Managing Groups in Keycloak
Section titled “Managing Groups in Keycloak”Keycloak is the identity and access management service used in Nebari. It allows you to create and manage users, groups, roles, and permissions. Groups in Keycloak are collections of users, and they can be assigned specific roles that grant permissions to access various services within Nebari.
For detailed information on managing groups in Keycloak, refer to the Keycloak documentation on Group Management.
Below we outline the steps specific to Nebari.
Creating a New Group
Section titled “Creating a New Group”To create a new group in Keycloak:
- Log in to Keycloak as an administrator (usually the
rootuser). - Navigate to Groups: Click on Groups in the left-hand menu.
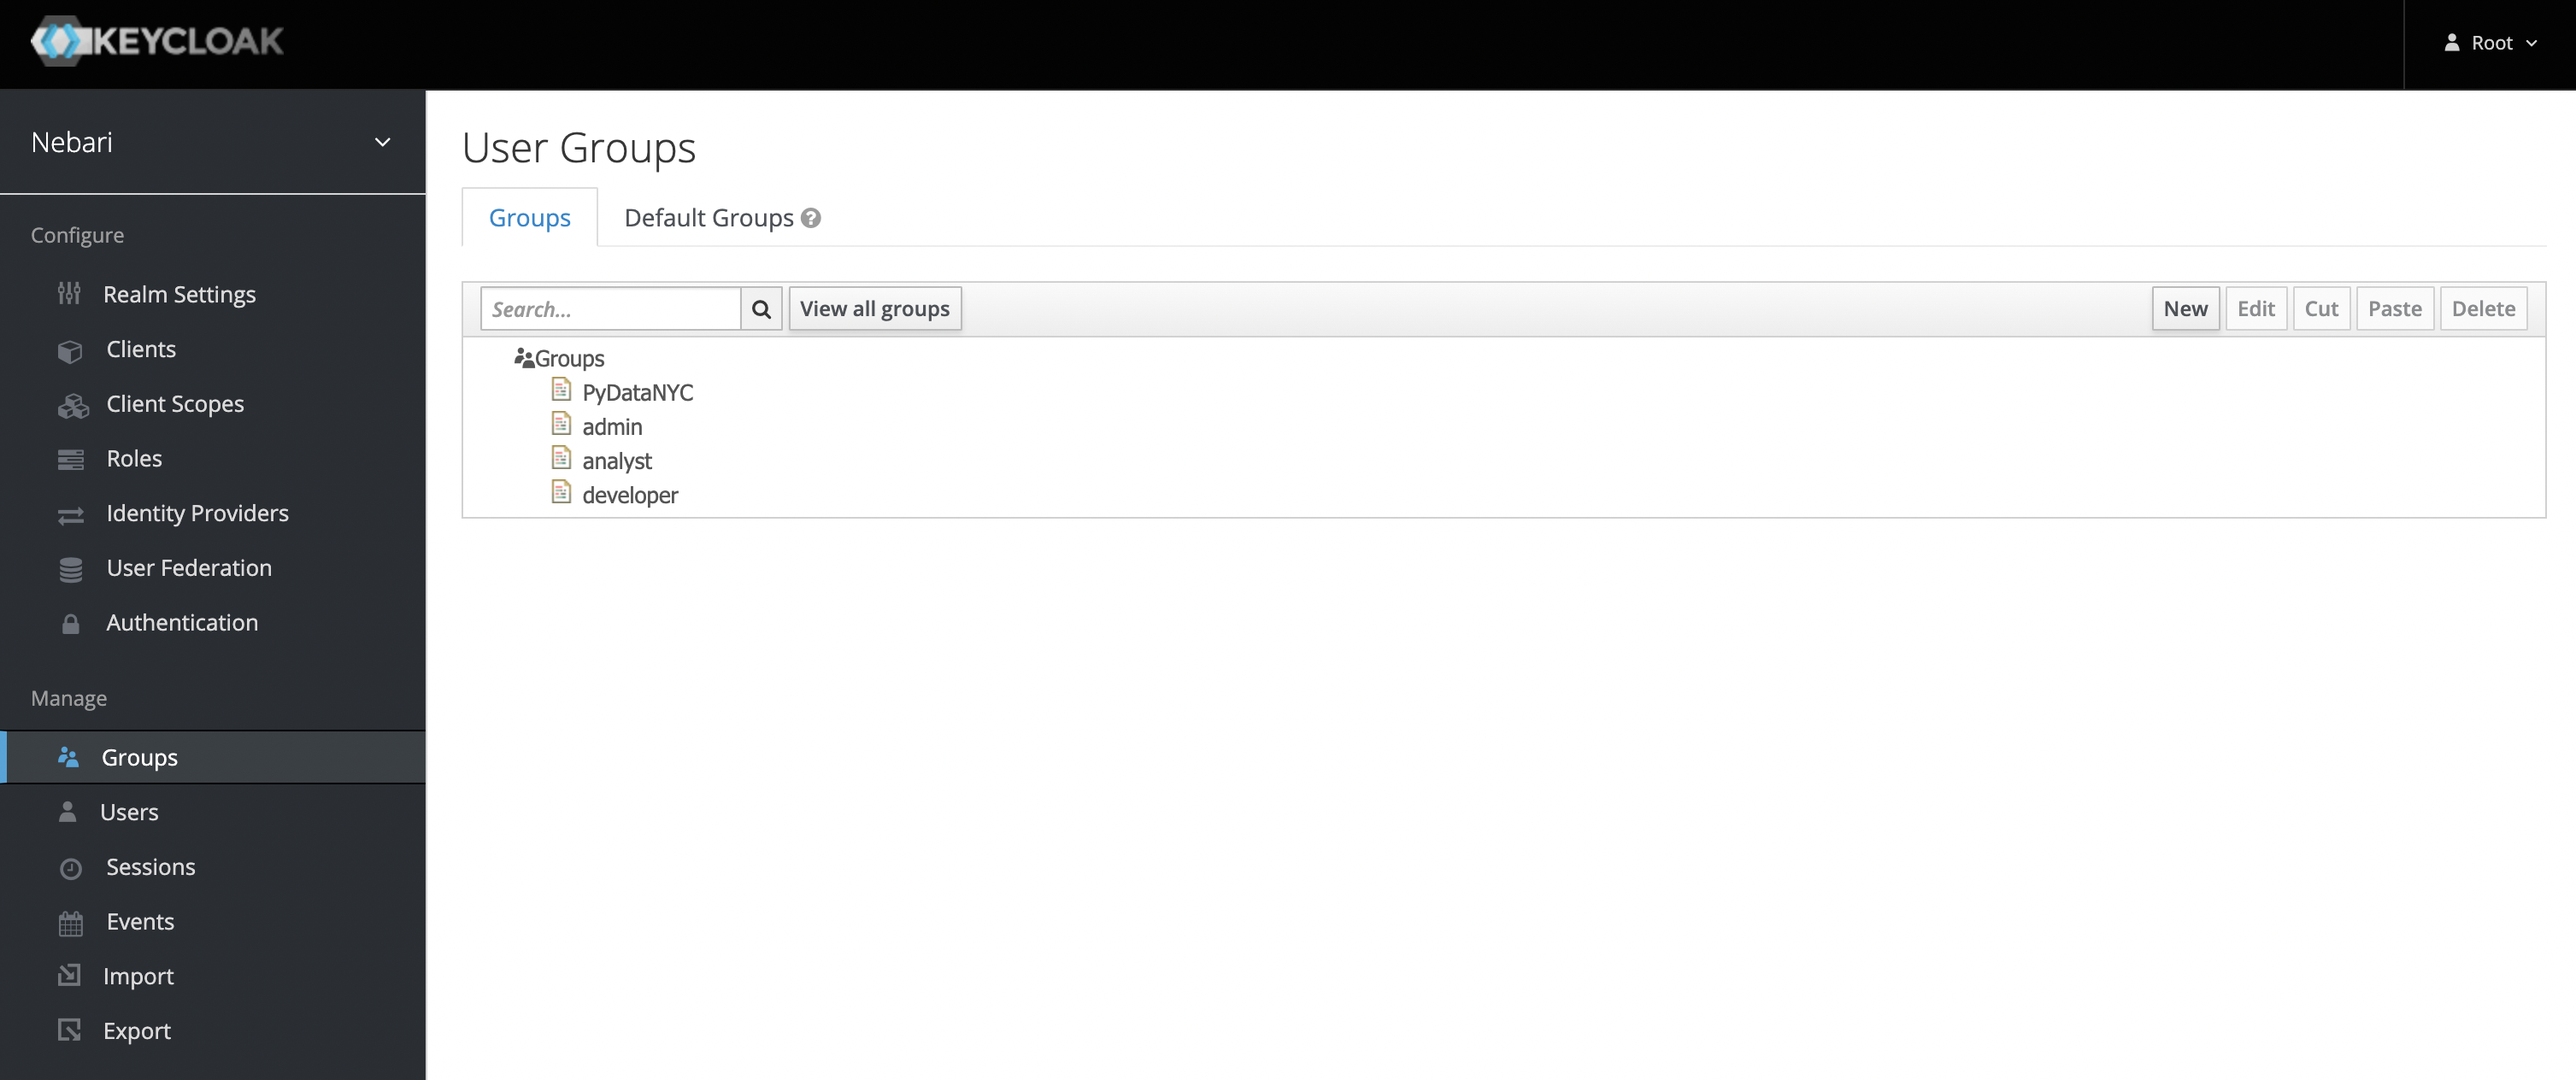
- Create the Group: Click the New button, enter an appropriate name for your new group (e.g.,
conda-store-manager), and save.
If you wish to organize your groups hierarchically, you can create subgroups by selecting a parent group and adding a subgroup.
Example Workflow: Creating a conda-store-manager group
- Click New in the upper-right corner under Groups.
- Give the new group an appropriate name.

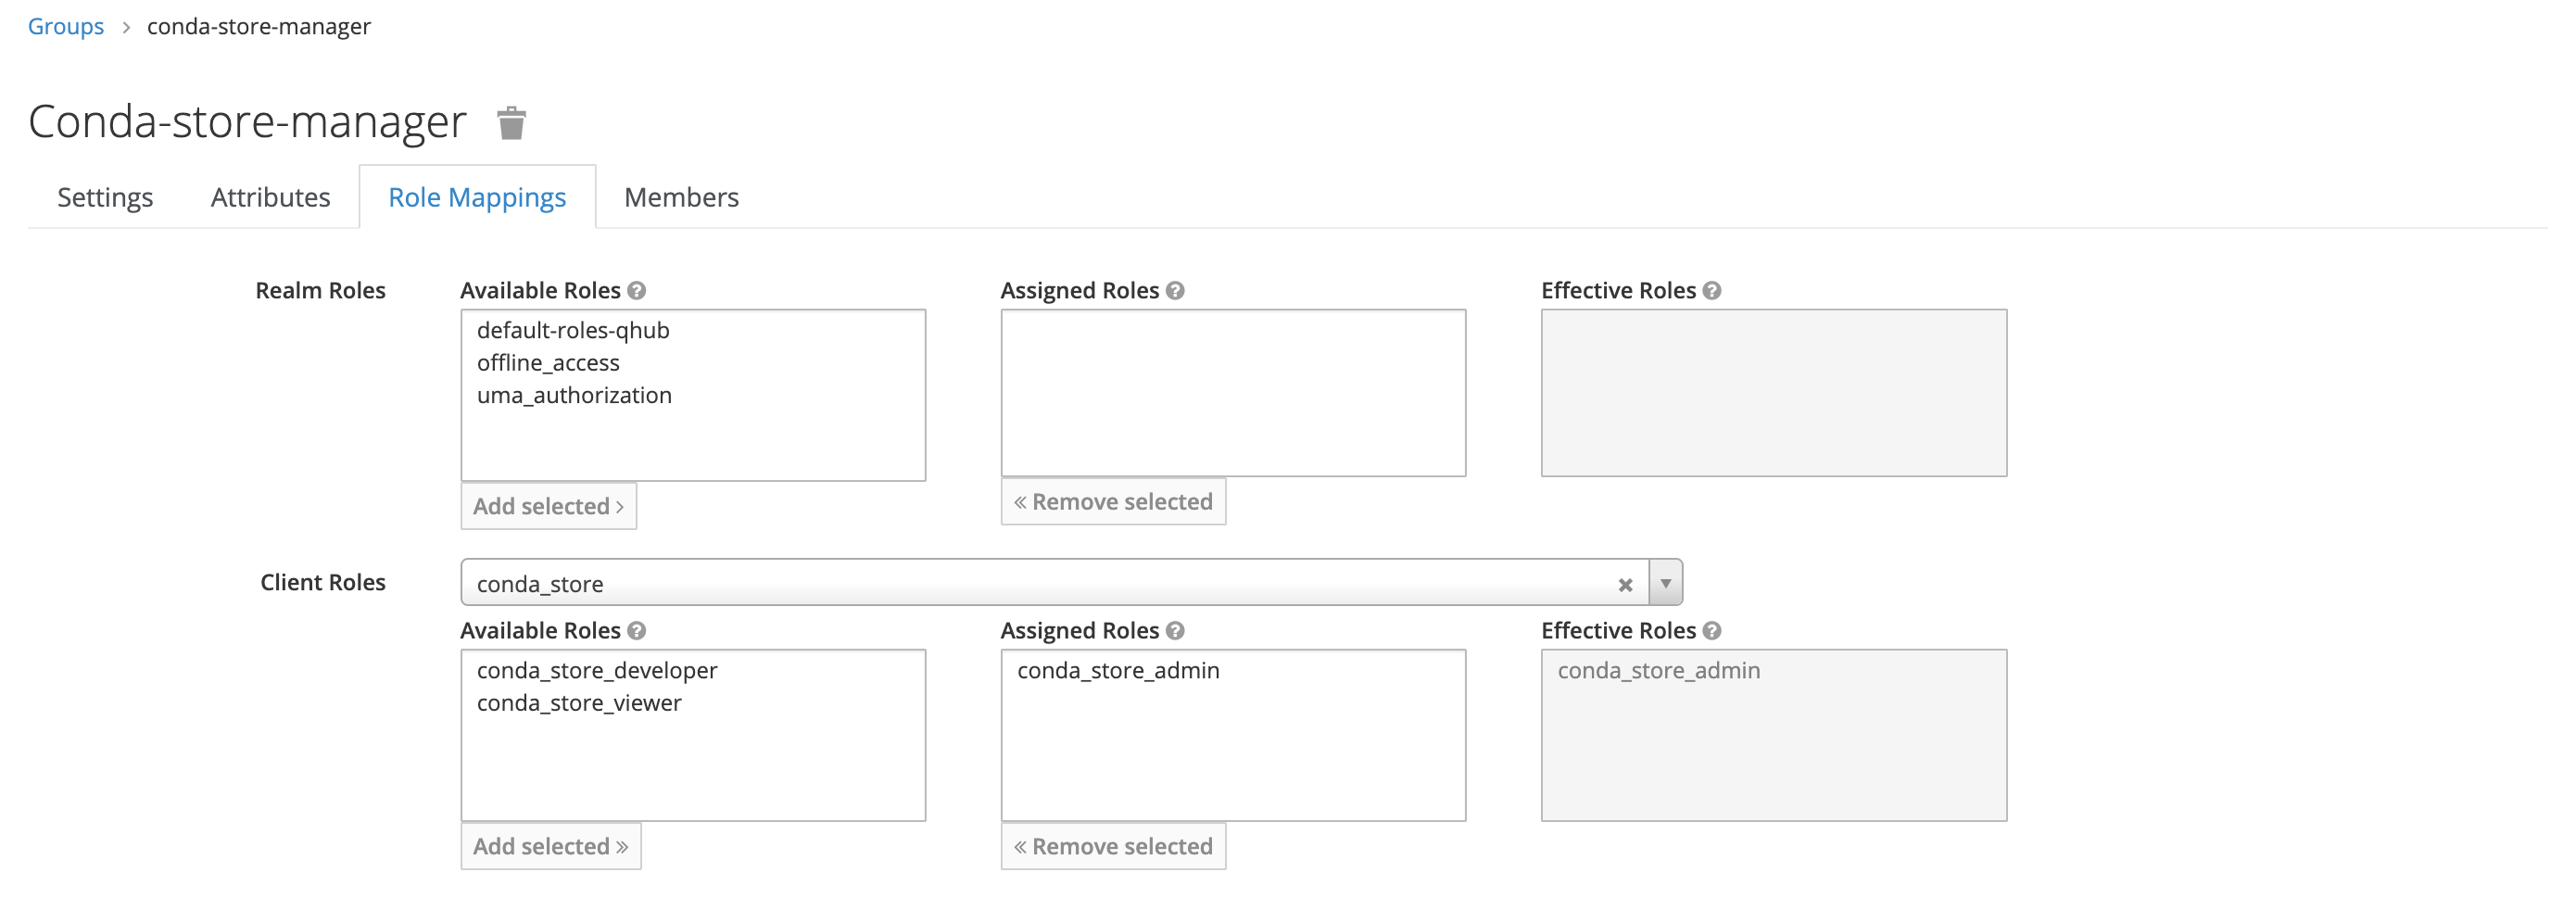
- Under Role Mapping, add the appropriate Client Roles as needed; there should be no need to update the Realm Roles.
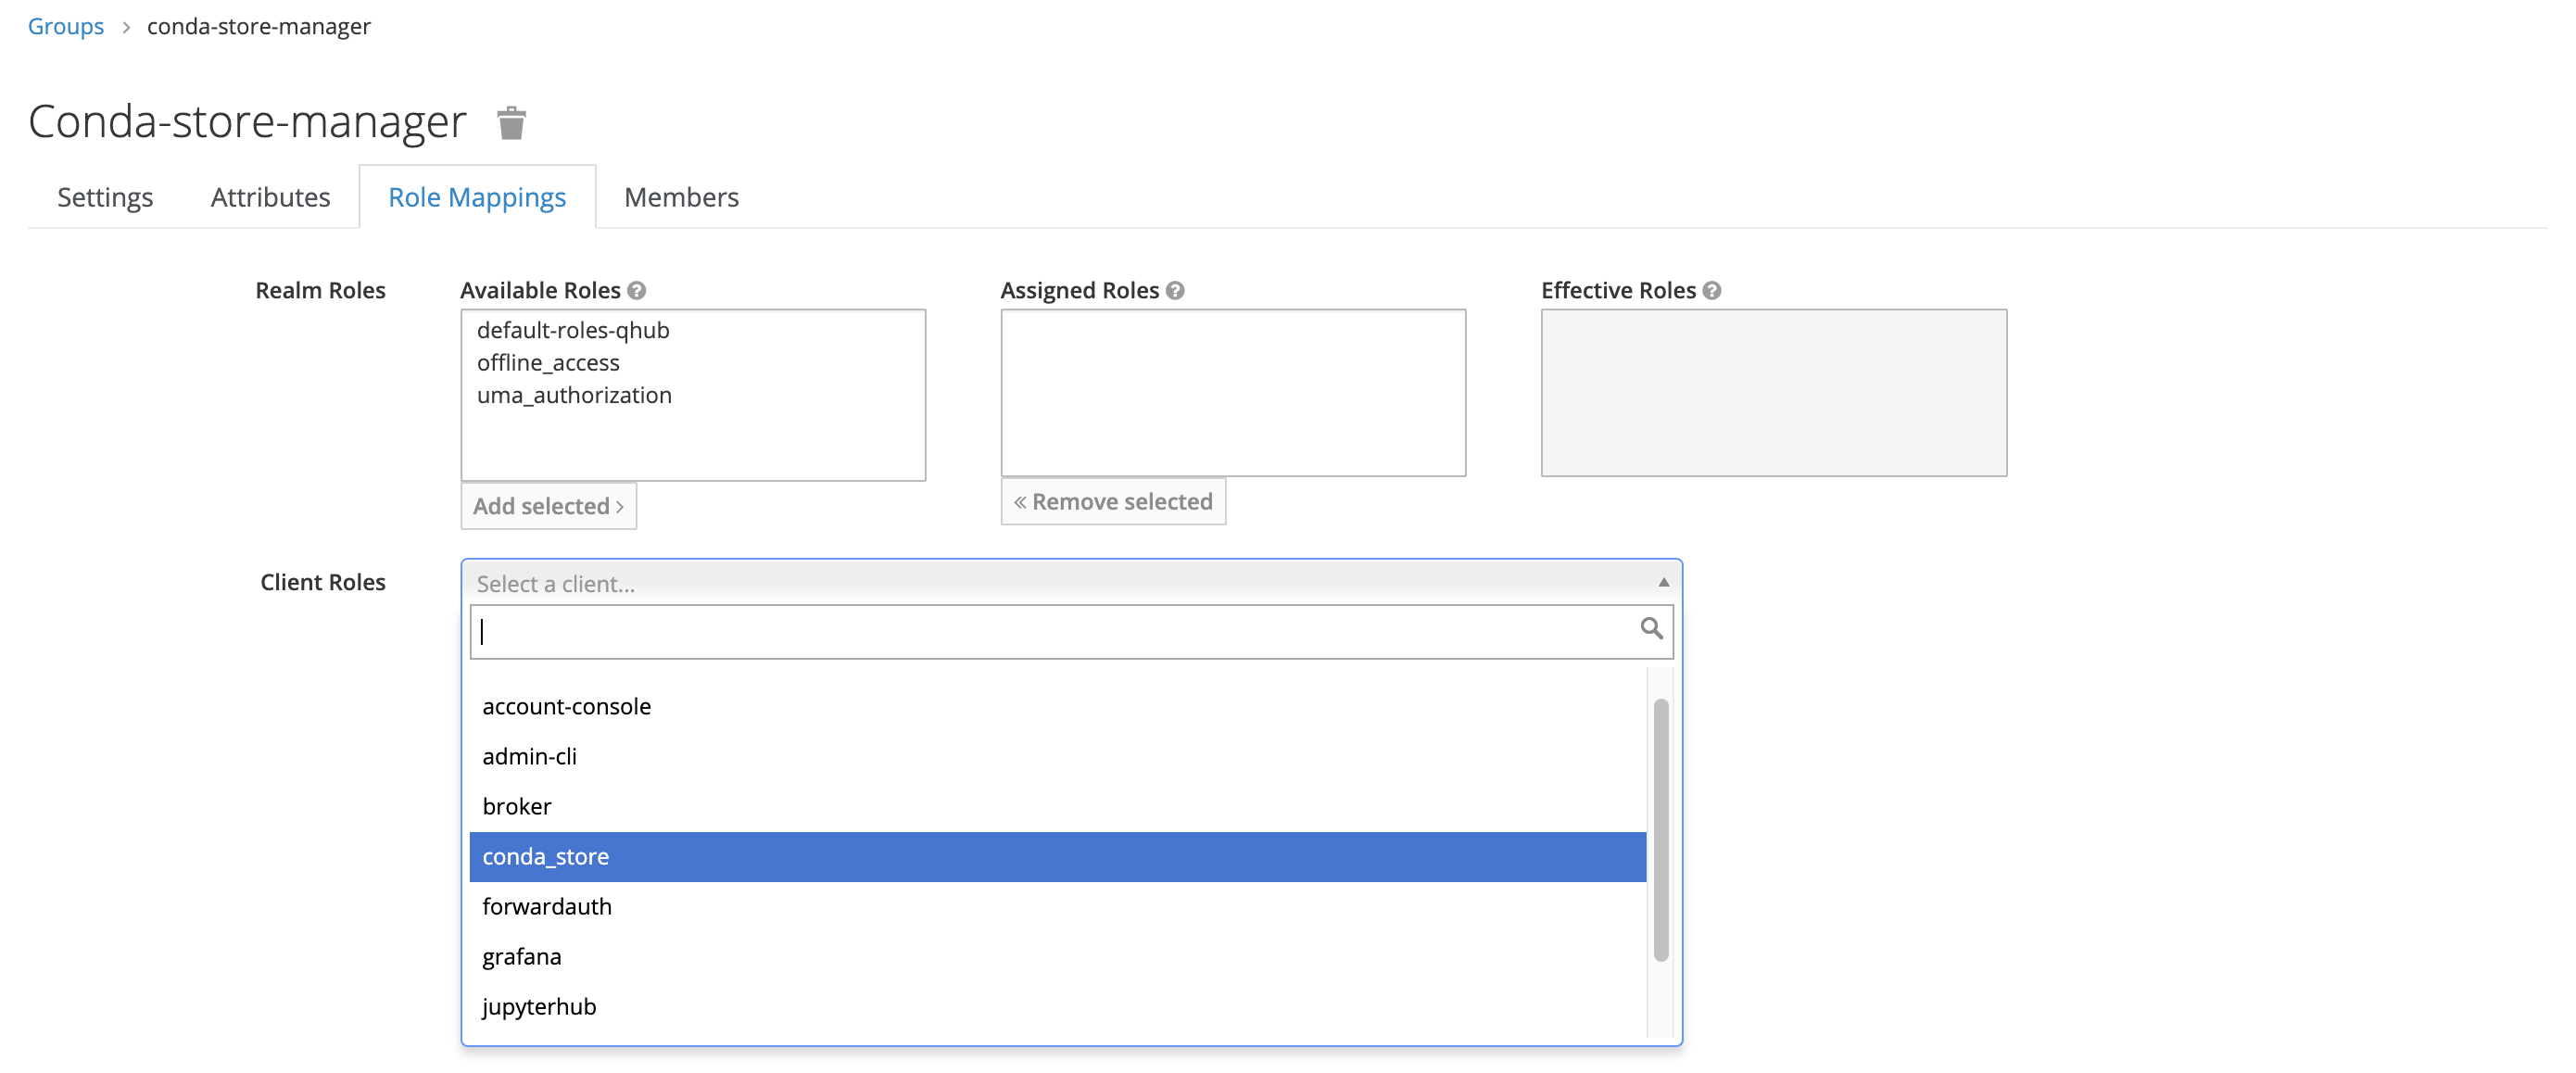
In this example, the new group only has one mapped role, conda_store_admin; however, it's possible to attach multiple Client Roles to a single group.
Managing Subgroups
Section titled “Managing Subgroups”Subgroups allow you to create a hierarchical structure of groups, representing organizational units, projects, or teams.
To manage subgroups:
- Creating Subgroups: Select the parent group, navigate to the Sub Groups tab, and create a new subgroup.
- Assigning Roles to Subgroups: Assign roles to subgroups following the same process as regular groups.
- Use Cases: Organize groups hierarchically to reflect organizational structures (e.g.,
engineering→data-science,engineering→backend).
For more information, see the Keycloak documentation on Group Hierarchies.
Deleting a Group
Section titled “Deleting a Group”To delete a group:
- Navigate to Groups: Click on Groups in the left-hand menu.
- Select the Group: Click on the group you want to delete.
- Delete: Click the Delete button and confirm.
Important: Deleting a group does not delete the users in that group. Users will simply lose the permissions associated with that group. Any shared directories associated with the group will remain in the file system but will no longer be mounted for users.
Creating Custom Roles with Scopes
Section titled “Creating Custom Roles with Scopes”Beyond Nebari's default roles, you can also create your own with highly specific permissions.
Understanding Components and Scopes
Section titled “Understanding Components and Scopes”In Nebari, scopes are closely tied to the service (client) you're working with—in Keycloak roles we identify them as "components."
Components Attribute
Section titled “Components Attribute”The value of the component attribute depends on the service we are creating a role for. Currently, Nebari supports:
jupyterhub: to createjupyterhubnative roles in thejupyterhubclient.conda-store: to createconda-storeroles in theconda_storeclient.
Scope Syntax by Service
Section titled “Scope Syntax by Service”JupyterHub Scopes
Section titled “JupyterHub Scopes”JupyterHub scopes syntax in Nebari follow JupyterHub's built-in RBAC syntax.
Syntax: scope1,scope2,scope3
Example:
shares!user,read:users:name,read:groups:nameshares!user: Allows sharing servers with other users.read:users:name: Grants read access to other users' names.read:groups:name: Grants read access to other groups' names.
This combination allows a user to share their server with others (via shares!user) and also read other users' and groups' names.
Common Use Case - App Sharing:
shares!user=alice,shares!group=data-science,read:users:name,read:groups:nameAllows sharing apps with user alice and the data-science group.
For a complete list of JupyterHub scopes, see the JupyterHub documentation: https://jupyterhub.readthedocs.io/en/stable/rbac/scopes.html#available-scopes
Nebari extends these scopes for some integrations (e.g., jhub-apps) to support sharing apps with users/groups.
Conda-Store Scopes
Section titled “Conda-Store Scopes”Conda-Store scopes are defined at the namespace level.
Syntax: <access_level>!namespace=<namespace_name>
Access Levels: admin, developer, viewer
Example:
admin!namespace=analyst,developer!namespace=nebari-gitadmin!namespace=analyst: Grants an admin role in theanalystnamespace.developer!namespace=nebari-git: Grants a developer role in thenebari-gitnamespace.
Common Use Case - Multi-namespace Access:
admin!namespace=data-science,viewer!namespace=production,viewer!namespace=shared-datasetsGrants admin access to the team's namespace, but read-only to production and shared datasets.
Step-by-Step: Creating a Custom Role
Section titled “Step-by-Step: Creating a Custom Role”Typical Workflow:
- Create a role (and define its scopes) under the relevant Client (e.g.,
jupyterhub,conda_store). - Assign this role to a group (or directly to an individual user).
- Add users to that group if you haven't already.
- Users log out and back in for changes to take effect.
Step 1: Create the Role
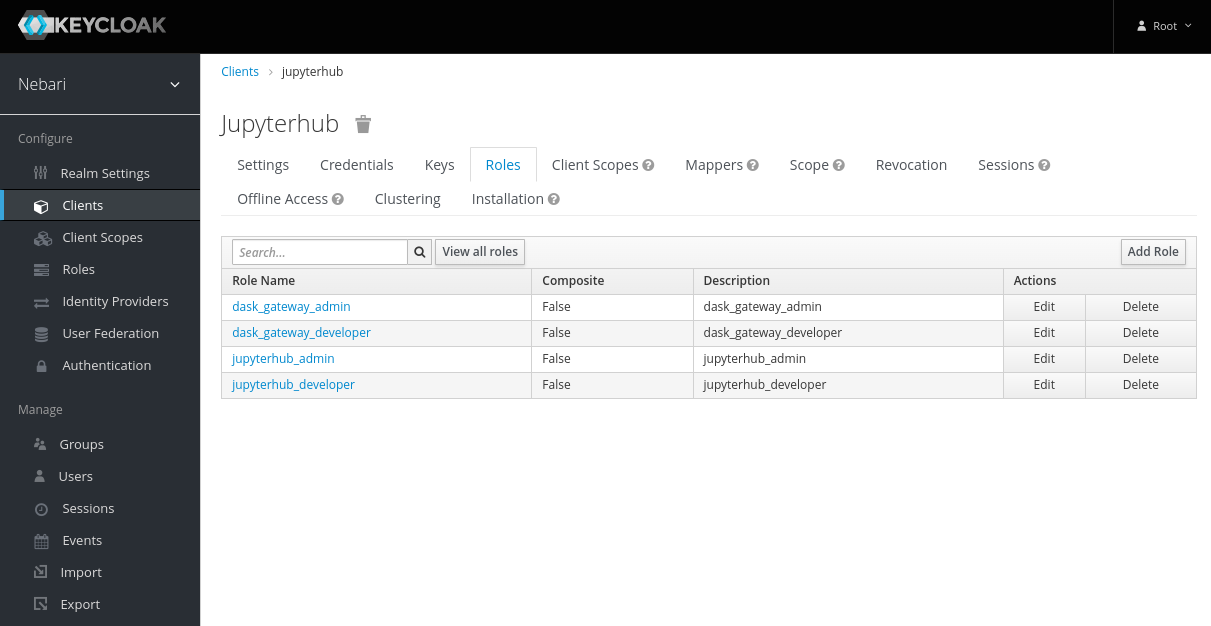
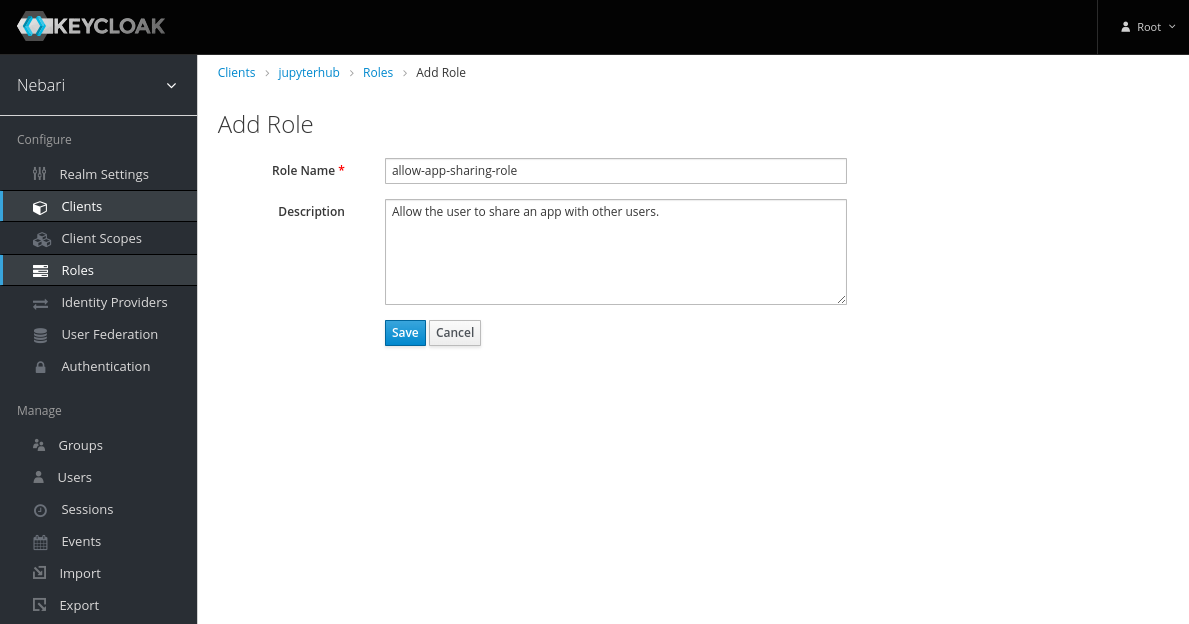
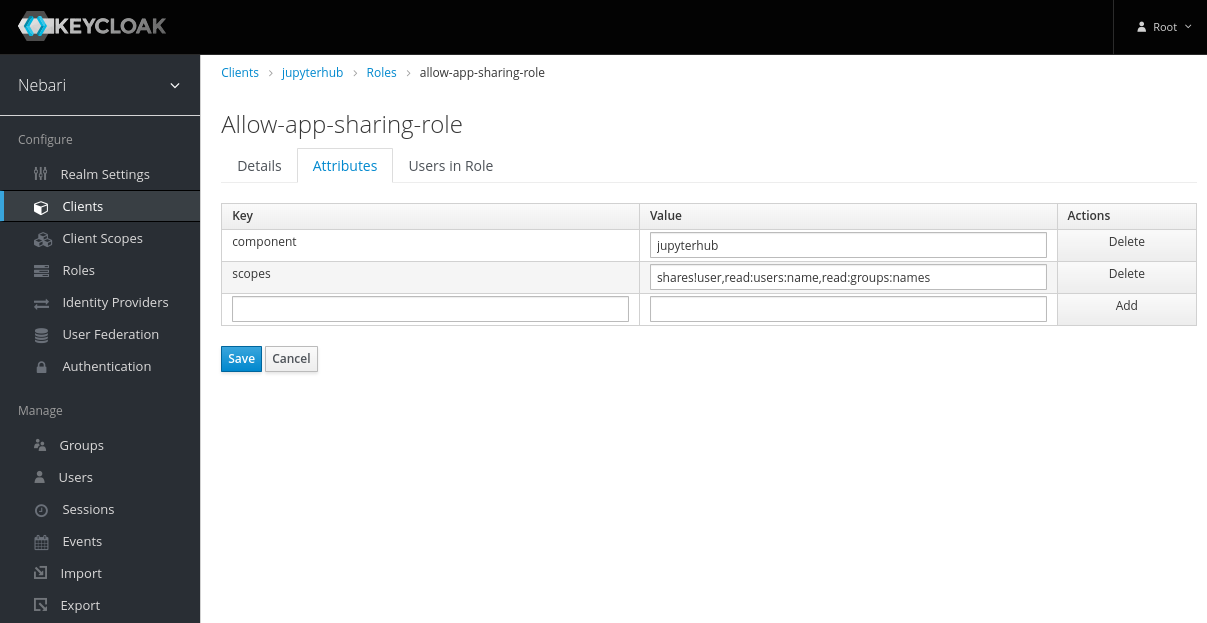
Section titled “Step 1: Create the Role”In the following example, we create a new role for the JupyterHub client granting permissions to share apps with users and groups.
- Select the appropriate client and click on Add Role.
- On the Add Role form, write a meaningful name and description for the role. Click Save.
- Now the role has been created, but it does nothing. Add permissions by clicking on the Attributes tab and adding
componentsandscopes.
Step 2: Assign Role to a Group
Section titled “Step 2: Assign Role to a Group”Creating a role in Keycloak has no effect on any user or group's permissions until it is assigned.
To add a role to a group:
- Select Groups on the left sidebar and search for the group.
- Select that group and click on the Role Mappings tab.
- Select the client associated with the role from the Client Roles dropdown.
- Select the role in Available Roles and click Add Selected >>.
Once complete, any users in this group will inherit the role's permissions after they log out and back in.
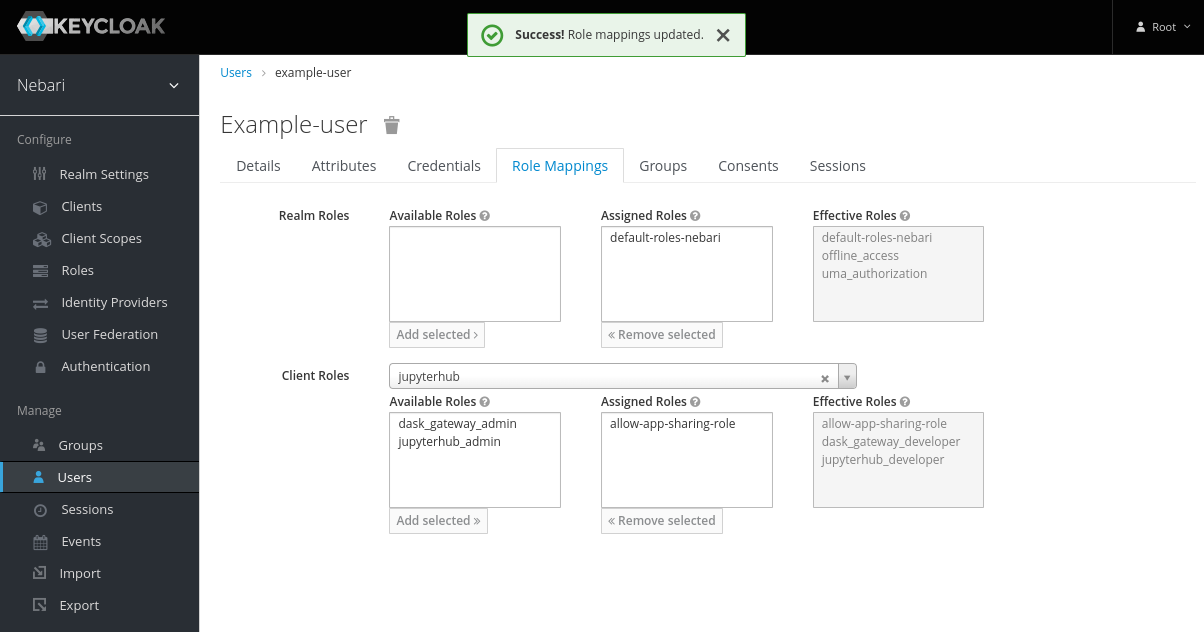
Step 3: Assign Role to a User (Alternative)
Section titled “Step 3: Assign Role to a User (Alternative)”To add a role directly to a user:
- Select Users on the left sidebar and search for the user.
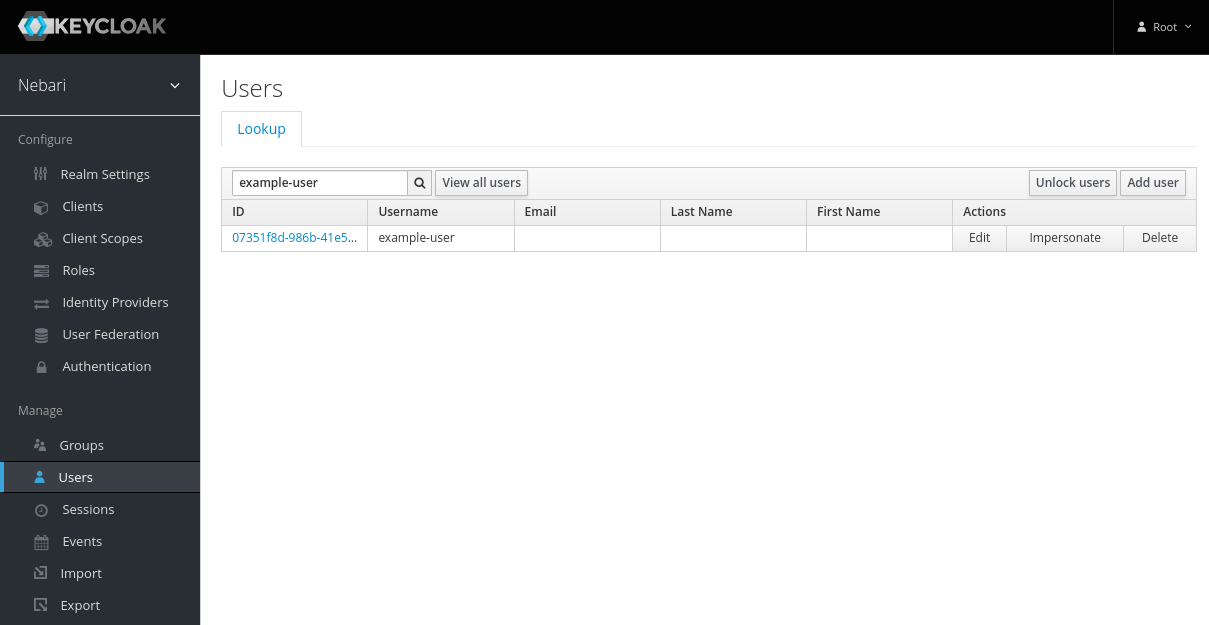
- Select that user and click on the Role Mappings tab.
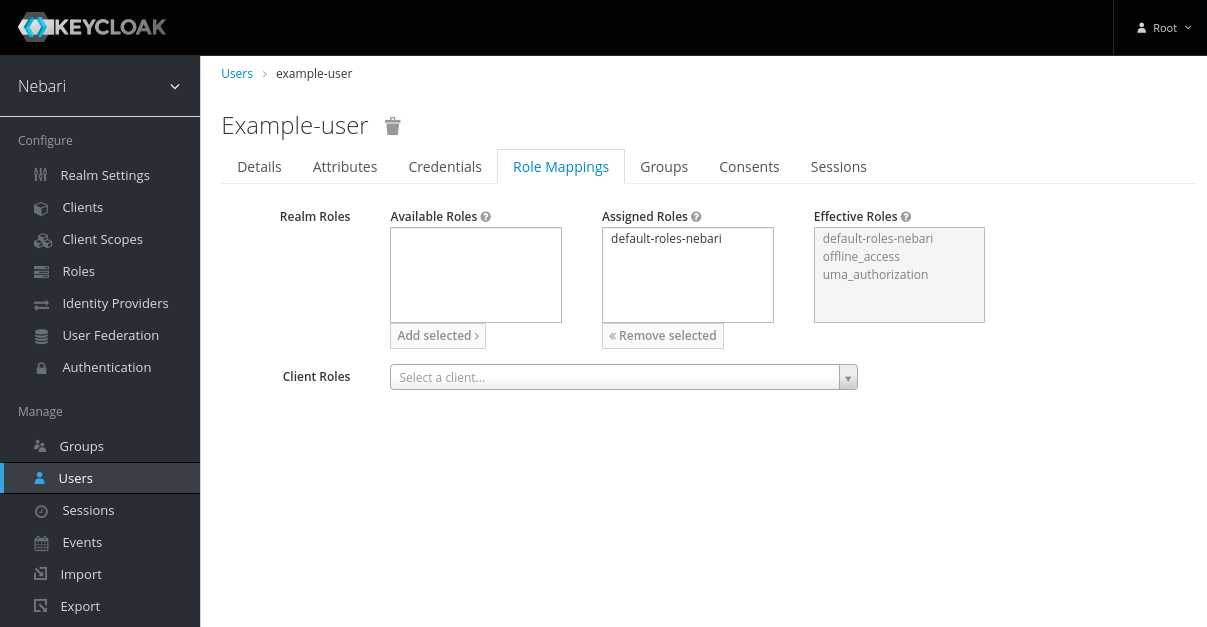
- Select the client associated with the role.
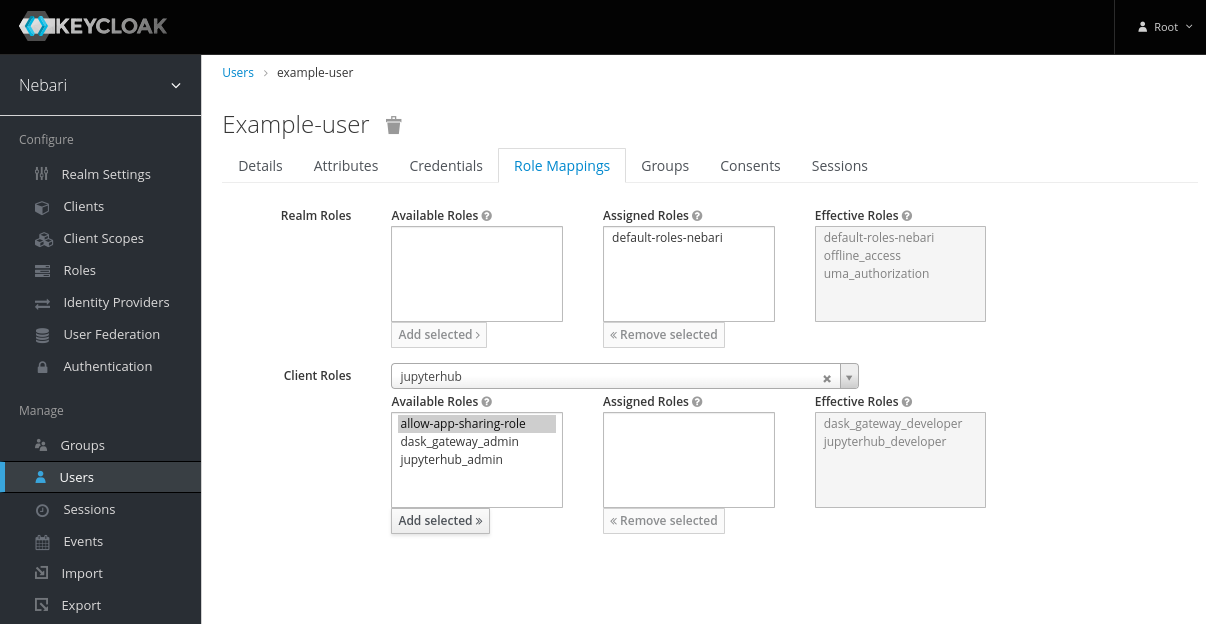
- Select the role in Available Roles and click Add Selected >>.
Example: Custom Role Scenarios
Section titled “Example: Custom Role Scenarios”Scenario 1: Data Science Team Lead
- Goal: Admin access to team namespace, read-only to production
- Component:
conda-store - Scopes:
admin!namespace=data-science,viewer!namespace=production
Scenario 2: App Collaborator
- Goal: Share JupyterHub apps with specific users and groups
- Component:
jupyterhub - Scopes:
shares!user,shares!group,read:users:name,read:groups:name
Scenario 3: Cross-functional Analyst
- Goal: Developer access to multiple namespaces
- Component:
conda-store - Scopes:
developer!namespace=marketing,developer!namespace=sales,viewer!namespace=finance
Managing Users and Group Membership
Section titled “Managing Users and Group Membership”Adding Users to a Group
Section titled “Adding Users to a Group”To add users to a group:
- Navigate to Users: Click on Users in the left-hand menu.
- Select a User: Choose the user you want to add to a group.
- Assign to Group:
- Click on the Groups tab within the user's details.
- Click the Join button.
- Select the group (and subgroup, if applicable) you wish to add the user to.
- Click Join to add the user to the group.
Repeat this process for all users who should be part of the group.
Removing Users from a Group
Section titled “Removing Users from a Group”To remove users from a group:
- Navigate to Users: Click on Users in the left-hand menu.
- Select a User: Choose the user you want to remove from a group.
- Remove from Group:
- Click on the Groups tab within the user's details.
- Find the group in the Group Membership list.
- Click Leave next to the group name.
The user will immediately lose access to group-level permissions, but changes won't take effect until their next login (when a new access token is issued).
Removing Roles from Users or Groups
Section titled “Removing Roles from Users or Groups”To remove a role from a user or group:
- Navigate to the user or group's Role Mappings tab.
- Under Assigned Roles, find the role you want to remove.
- Select the role and click Remove selected.
Again, changes take effect after the user logs out and back in.
Managing Group Directories in JupyterHub
Section titled “Managing Group Directories in JupyterHub”Understanding Group Directories
Section titled “Understanding Group Directories”A group directory in JupyterHub is a shared folder accessible to all members of a specific group. It provides a shared space within the file system for collaboration.
An example directory structure:
/shared├── admin│ ├── file1.txt│ └── file2.txt├── analyst│ ├── file1.txt│ └── file2.txt└── developer ├── file1.txt └── file2.txtAssigning the allow-group-directory-creation-role to a Group
Section titled “Assigning the allow-group-directory-creation-role to a Group”To enable directory creation and mounting for a group in JupyterHub, assign the allow-group-directory-creation-role to the group in Keycloak.
- Navigate to the Group: Log in to Keycloak as an administrator and select the group.
- Go to Role Mappings: Click on the Role Mappings tab.
- Assign the Role:
- Under Client Roles, select the
jupyterhubclient. - Select
allow-group-directory-creation-roleand click Add selected.
- Under Client Roles, select the
Users in this group will now have access to the group's shared directory in JupyterHub after they log out and back in.
Removing Group Directory Access
Section titled “Removing Group Directory Access”To remove the group's directory access:
- Navigate to the Group's Role Mappings: Select the group and go to the Role Mappings tab.
- Remove the Role:
- Under Assigned Roles, select
allow-group-directory-creation-role. - Click Remove selected.
- Under Assigned Roles, select
Data Preservation: No data is deleted when you remove the role; the directory is simply unmounted from users' JupyterLab sessions.
Managing Subgroup Directories
Section titled “Managing Subgroup Directories”Subgroups can have their own directories in JupyterHub if assigned the allow-group-directory-creation-role. Assign the role to subgroups as needed to control access and collaboration.
Example Hierarchy:
/shared├── engineering│ ├── data-science│ │ └── models│ └── backend│ └── configs└── marketing └── campaignsPermission Precedence and Troubleshooting
Section titled “Permission Precedence and Troubleshooting”How Permissions Stack
Section titled “How Permissions Stack”When a user belongs to multiple groups or has multiple roles assigned, Nebari uses the following rules to determine effective permissions:
-
Highest Permission Wins: If conflicting permissions exist, the most permissive one takes precedence.
- Example: User in both
viewergroup (read-only) andadmingroup (read-write) → user gets read-write access
- Example: User in both
-
Service-Specific Precedence:
- Conda-Store: SuperAdmin > Explicit Scopes > Internal Defaults > No Access
- JupyterHub: Scopes are additive; all granted scopes apply
-
Personal Namespaces: Always admin access in Conda-Store (cannot be downgraded)
Common Issues and Solutions
Section titled “Common Issues and Solutions”Issue 1: Changes Not Taking Effect
Section titled “Issue 1: Changes Not Taking Effect”Symptom: User was added to a group or assigned a role, but still can't access resources.
Solution:
- User must log out completely and log back in
- Keycloak issues new access tokens on login with updated permissions
- Refreshing the page is not sufficient
Issue 2: User Has Too Many Permissions
Section titled “Issue 2: User Has Too Many Permissions”Symptom: User can access resources they shouldn't be able to.
Solution:
- Check all groups the user belongs to
- Check direct role assignments to the user
- Remember: highest permission wins, so remove the more permissive role/group
- User must log out and back in
Issue 3: Group Directory Not Appearing
Section titled “Issue 3: Group Directory Not Appearing”Symptom: Users in a group can't see the shared directory.
Solution:
- Verify the group has
allow-group-directory-creation-roleassigned - User must log out and back in to mount the directory
- Check JupyterHub logs for errors
- Verify the directory exists in the file system
Issue 4: Custom Role Not Working
Section titled “Issue 4: Custom Role Not Working”Symptom: Created a custom role with scopes, but it has no effect.
Solution:
- Verify
componentsattribute is set correctly (e.g.,jupyterhuborconda-store) - Verify
scopesattribute syntax matches the service requirements - Ensure role is assigned to a group or user via Role Mappings
- User must log out and back in
Testing Permissions
Section titled “Testing Permissions”To verify a user's permissions:
- JupyterHub: Check the user's token scopes via the JupyterHub API:
curl -H "Authorization: token <user-token>" \ https://<nebari-url>/hub/api/user-
Conda-Store: Attempt to access namespaces through the UI or API and observe access levels
-
Keycloak: Review the user's Role Mappings and Group Membership tabs