Deploy Nebari on local machines (for testing)
Nebari supports a "local testing" mode that helps you develop and efficiently run Nebari on any environment, which can vary from a Virtual Machine, a laptop, or a sizeable multi-node ecosystem.
This installation mode is intended to be used as a debugging tool or, to some extent, as a preview of Nebari functionalities. Thus we do not recommend its use in a production environment. It's important to highlight that while it's possible to test most of Nebari with this version, components that are Cloud provisioned such as VPCs, managed Kubernetes cluster, and managed container registries can't be locally tested, due to their Cloud dependencies.
To operate in this mode, Nebari uses "kind" to maintain and deploy the Kubernetes environment where its resources will be integrated with. This deployment mode allows quicker feedback loops for development, as well as removes the requisites imposed by using a cloud Kubernetes cluster.
What is kind?
kind is a tool for running local Kubernetes clusters using Docker container "nodes". kind was primarily designed for testing Kubernetes itself, but may be used for local development or CI.
The advantages of using kind are:
- kind supports multi-node (including HA) clusters
- kind supports building Kubernetes release builds from source
- support for make / bash or docker, in addition to pre-published builds
- kind supports Linux, macOS and Windows
- kind is a CNCF certified conformant Kubernetes installer
Compatibility
Nebari integrates kind under the hood by using its Terraform provider and a proper local deployment method, which grants native OS compatibility with Linux.
Currently, Nebari does not support local mode on Windows.
To use kind, you will also need to install docker engine.
While kubectl is not required for kind to work, we do recommended its installation as it provides an excellent interface for interacting with the cluster resources.
To install kubectl and configure access to the Nebari cluster, refer to Install and Set Up kubectl.
Initializing Nebari
The following steps assume you have:
- An installed version of Nebari, for any directions please visit Install Nebari section,
- confirmed that
nebariis successfully installed in your environment.
-
In your terminal, start by creating a new project folder. For this demonstration, we will name the new folder
nebari-local:mkdir nebari-local && cd nebari-local -
Executing the command below will generate a basic config file with an infrastructure based on local, with project name
projectname, endpoint domaindomain, and with the authentication mode set to password.nebari init local \
--project projectname \
--domain domain \
--auth-provider password \
--terraform-state=localWhere
--terraform-state=localis used to tell Nebari to store the Terraform state in the local filesystem.
Note You will be prompted to enter values for some of the choices above if they are absent from the command line arguments (for example, project name and domain)
If you are deploying for testing purposes, omitting the --domain option is recommended to prevent issues related to setting up a DNS domain for your deployment. By default, at the end of your deployment, Nebari will return the external IP associated with the Kubernetes cluster's load balancer.
Once nebari init is executed, you should then be able to see the following output:
Securely generated default random password=*** for Keycloak root user
stored at path=/tmp/NEBARI_DEFAULT_PASSWORD
The main temp folder on a MacOS system can be found by inspecting the value of $TMPDIR.
This folder and its files are not meant to be user-facing and will present you
with a seemingly random directory path similar to /var/folders/xx/xxxxx/T
You can see that Nebari is generating a random password for the root user of Keycloak. This password is stored in a temporary file and will be used to authenticate to the Keycloak server once Nebari's infrastructure is fully deployed, in order to create the first user accounts for administrator(s).
The Nebari initialization scripts create a nebari-config.yaml file that contains a collection of default preferences and settings for your deployment.
The generated nebari-config.yaml is the configuration file that will determine how the cloud infrastructure and Nebari is built and deployed in the next step.
Since it is a regular text file, you can edit it manually if you are unhappy with the choices you made during initialization, or delete it and start over again by re-running nebari init.
You can also use the new Guided Init wizard for a step-by-step initialization process.
nebari init --guided-init
Setting up a DNS record for the domain
In order to deploy the infrastructure, we need to set up a DNS record for the <domain> you provided during initialization. This will be required for the infrastructure to be able to resolve the domain name. The local deployment sets the Ingress IP to 172.18.1.100 and assigns this to your domain.
To make this easier, open your /etc/hosts file with your favorite text editor and add the following line:
172.18.1.100 <domain>
If you are a Linux user, you can use the sudo command to gain root privileges and then run the following command to add the above line to your /etc/hosts file:
sudo echo "172.18.1.100 <domain>" | sudo tee -a /etc/hosts
See the domain-registry documentation for details.
Exposing container network (for MacOS)
Docker for macOS does not expose container networks directly on the MacOS host, for this we will use docker-mac-net-connect, which lets you connect directly to Docker-for-Mac containers via IP address. You can install and start it with following command:
# Install via Homebrew
$ brew install chipmk/tap/docker-mac-net-connect

# Run the service and register it to launch at boot
$ sudo brew services start chipmk/tap/docker-mac-net-connect
Docker Images
You can skip this section if you have an x86_64 machine. If you're using Mac M1, then the x86_64 docker images will not work out of the box. You would need to use images that are built with support for arm as well.
We're building all the docker images for both platforms except external images. The only external image relevant here is keycloak. You'd need to update the keycloak image for the deployment, which can be done by adding the override for the keycloak deployment to update the image:
security:
  keycloak:
    initial_root_password: <SANITIZED>
    overrides:
      image:
        repository: quay.io/nebari/keycloak
        tag: sha-b4a2d1e
Increase fs watches
Depending on your host system, you may need to increase the fs.inotify.max_user_watches and
fs.inotify.max_user_instances kernel parameters if you see the error "too many open files" in the logs of
a failing pod.
sudo sysctl fs.inotify.max_user_watches=524288
sudo sysctl fs.inotify.max_user_instances=512
See the kind troubleshooting docs for more information.
Deploying Nebari
With the nebari-config.yaml configuration file now created, Nebari can be deployed for the first time with:
nebari deploy -c nebari-config.yaml --disable-prompt
If the deployment is successful, you will see the following output:
[terraform]: Nebari deployed successfully
Services:
 - argo-workflows -> https://domain/argo/
 - conda_store -> https://domain/conda-store/
 - dask_gateway -> https://domain/gateway/
 - jupyterhub -> https://domain/
 - keycloak -> https://domain/auth/
 - monitoring -> https://domain/monitoring/
Kubernetes kubeconfig located at file:///tmp/NEBARI_KUBECONFIG
Kubecloak master realm username=root *****
...
Verify the local deployment
Finally, if everything is set properly you should be able to cURL the JupyterHub Server. Run
curl -k https://domain/hub/login
It's also possible to visit https://domain in your web browser to select the deployment.
As default for a local deployment the https certificates generated during deployments aren't signed by a recognized Certificate Authority (CA) and are self-signed by Traefik instead.
Several browsers makes it difficult to view a self-signed certificate that are not added to the certificate registry. So, if you do not want to use Let's Encrypt, you can use the following workarounds to properly view the pages:
A workaround for Firefox:
- Visit about:config and change the
network.stricttransportsecurity.preloadlisttofalse
And a workaround for Chrome:
- Type badidea or thisisunsafe while viewing the rendered page (this has to do with how Chrome preloads some domains for its HTTP Strict Transport Security list in a way that can't be manually removed)
Using Let's Encrypt Certificates
If your "local" deployment happens to be exposed to the internet (e.g. with a load balancer deployed and managed outside of Nebari) and you are able to set up a valid public DNS record, you can instead use Let's Encrypt to provision trusted TLS certificates. For more in-depth on DNS records and how Nebari handles their configuration, you can visit our Domain Registry documentation.
To switch the default behavior and use a Let's Encrypt signed certificate instead, you can update the following section in your nebari-config.yaml file, and then re-run nebari deploy as shown above:
certificate:
  type: lets-encrypt
  acme_email: <your-email-address>
  acme_server: https://acme-v02.api.letsencrypt.org/directory
Note the above snippet can be automatically provisioned in your configuration if you provided the --ssl-cert-email flag when you ran nebari init.
Let's Encrypt heavily rate limits their production endpoint. In order to avoid throttling, Nebari's traefik deployments will store certificates in an acme.json file for the duration of their validity. Nebari will mount a PVC and save the file on the container at the location /mnt/acme-certificates/acme.json.
In order to refresh the certificate before it is invalidated, you will need to delete the acme.json file then restart the Traefik deployment by deleting the existing pod and letting a new one spin up. This may be necessary if you change the domain name of your Nebari deployment.
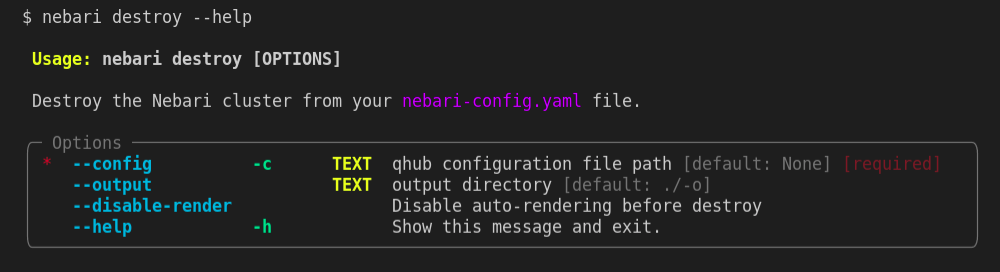
Destroying Nebari
Nebari also has a destroy command that works the same way the deploy works but instead of creating the provisioned resources it destroys it.
nebari destroy -c nebari-config.yaml
To see all the options available for the destroy command, type the following command on your command line:
nebari destroy --help