Troubleshooting
Invariably you will encounter behavior that does not match your expectations. This guide is meant to explain that behavior, give you some context around why it's happening, help you diagnose it, and if possible resolve it.
Configuration
Delete a conda-store build, environment or namespace
Please be patient as conda-store deletes the build, environment or namespace as it can take up to 30 minutes for these changes to propagate.
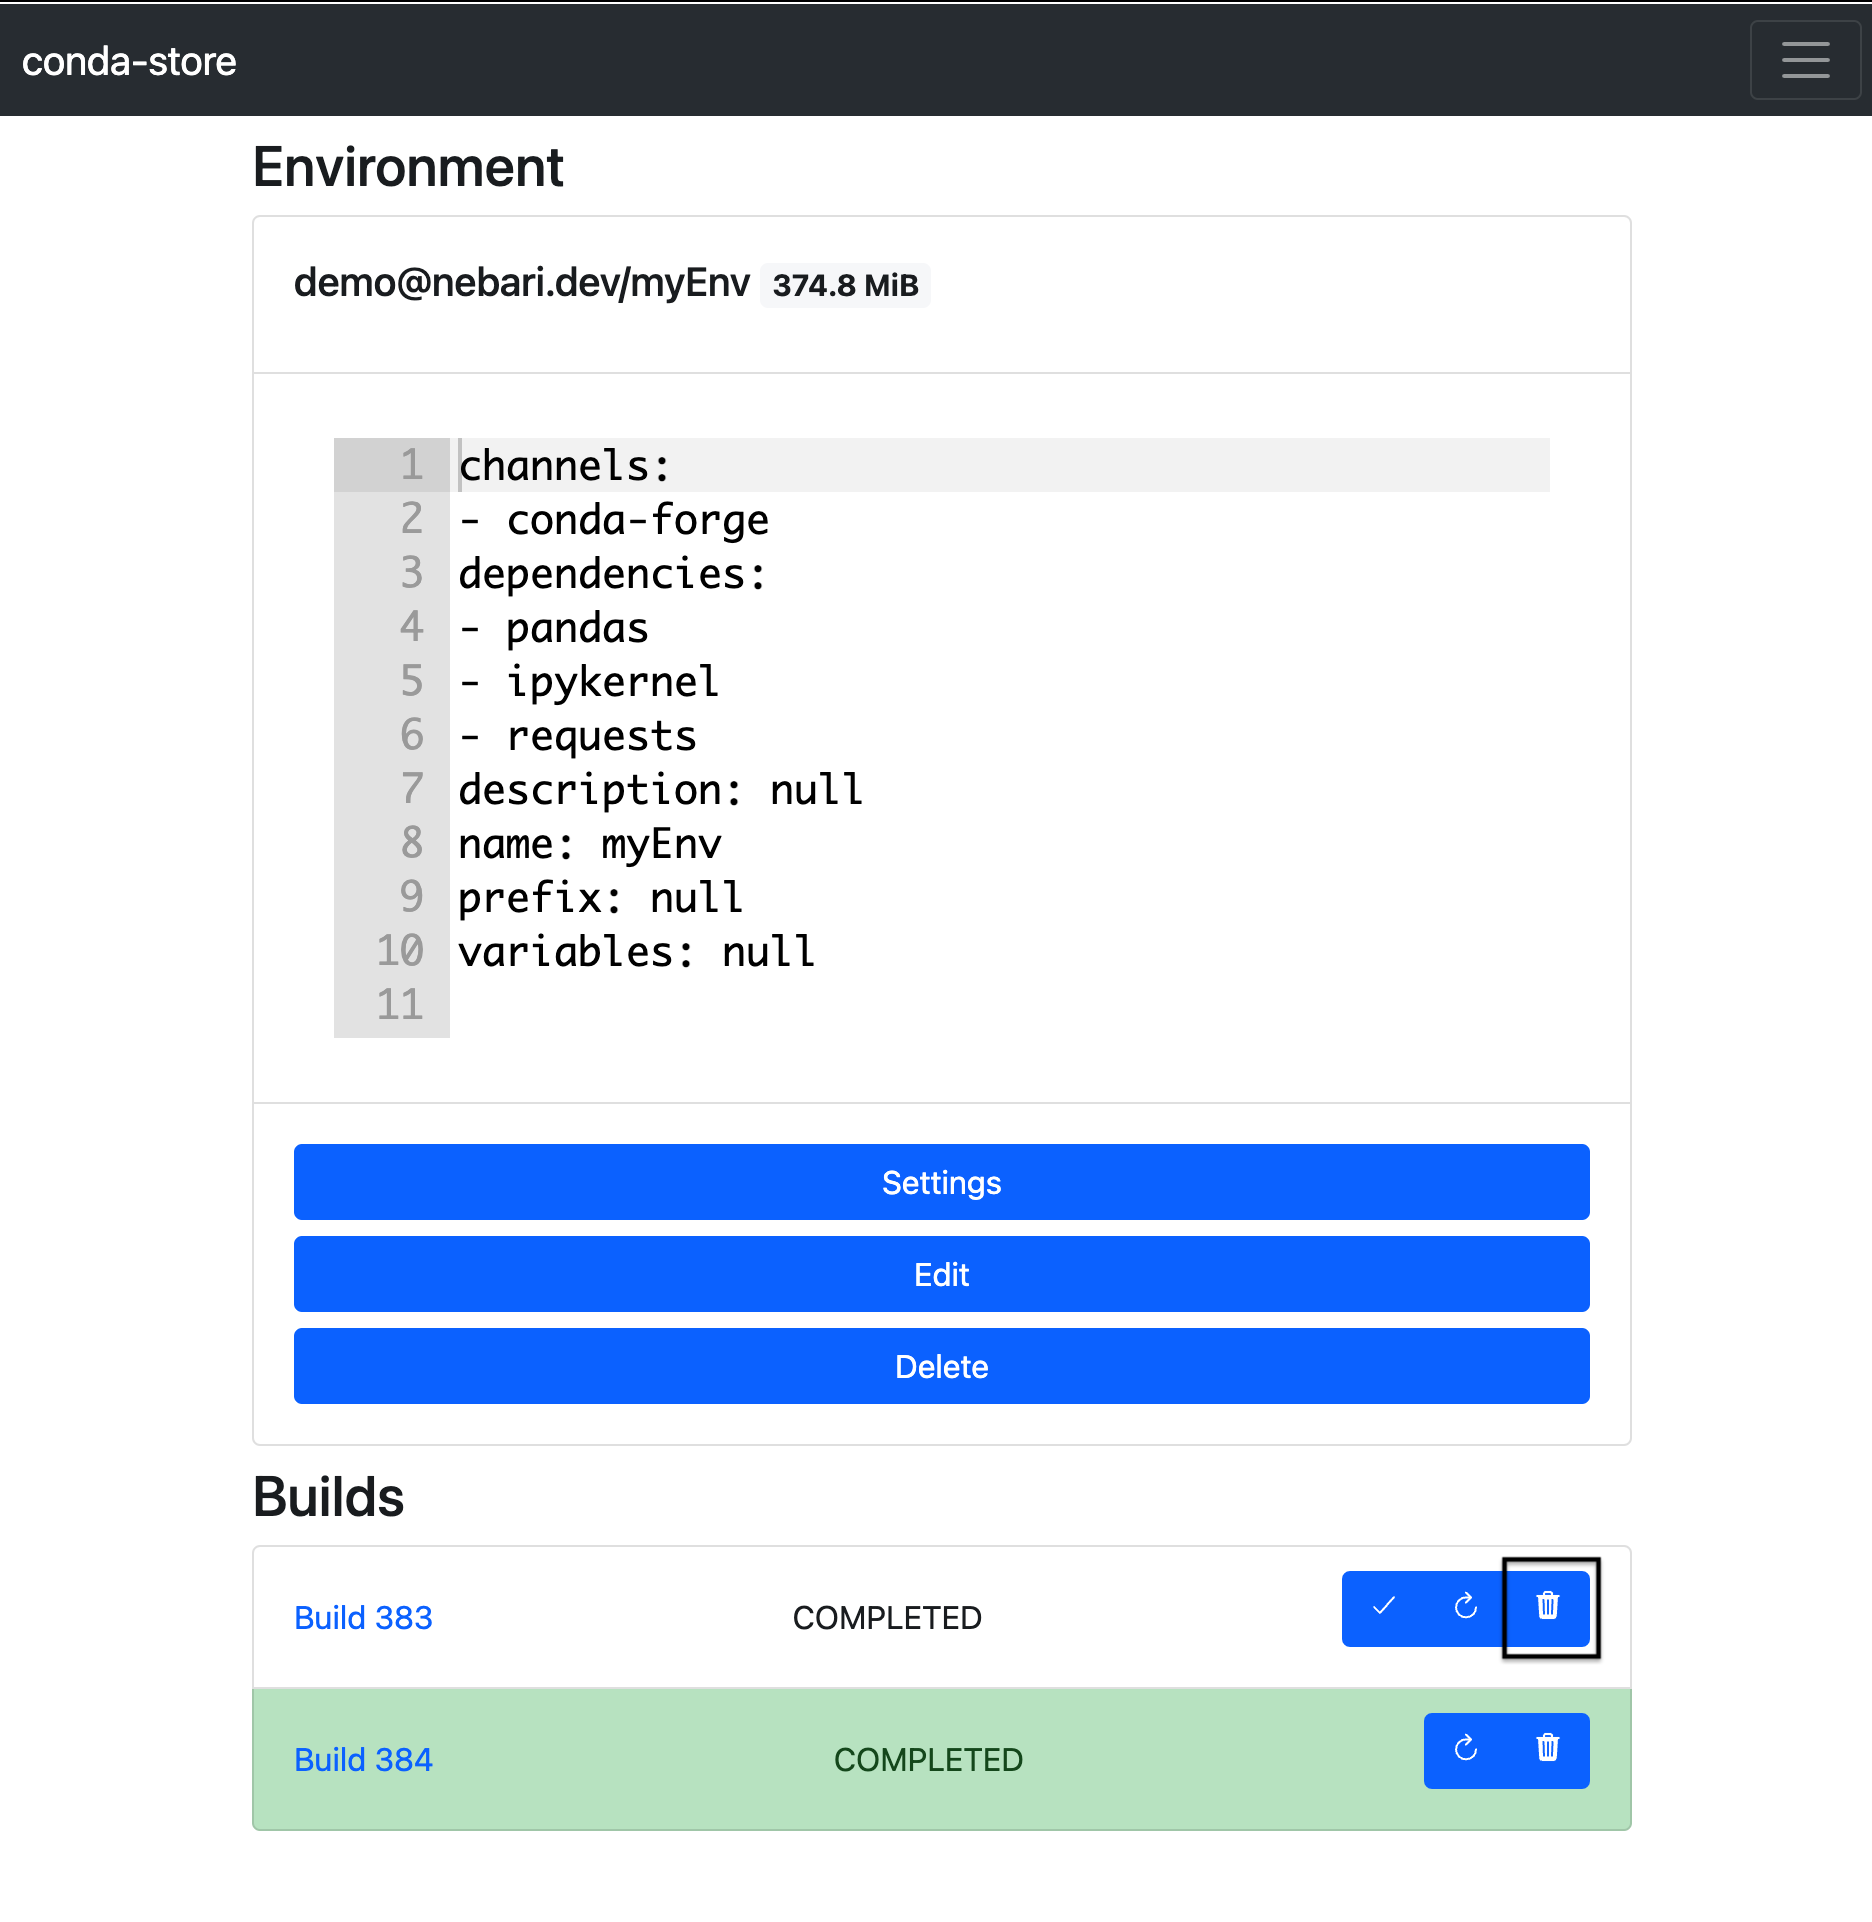
Delete a conda-store build
If you wish to delete a conda-store build, your user will need the conda_store_admin (in the admin group) or conda_store_superadmin
(in the superadmin group) role to be perform this action.
- Navigate to https://your-nebari-domain/conda-store/admin/ and login
- Navigate to the appropriate conda-store namespace and environment
- Locate the build you wish to delete and then click the trash can icon to delete the build
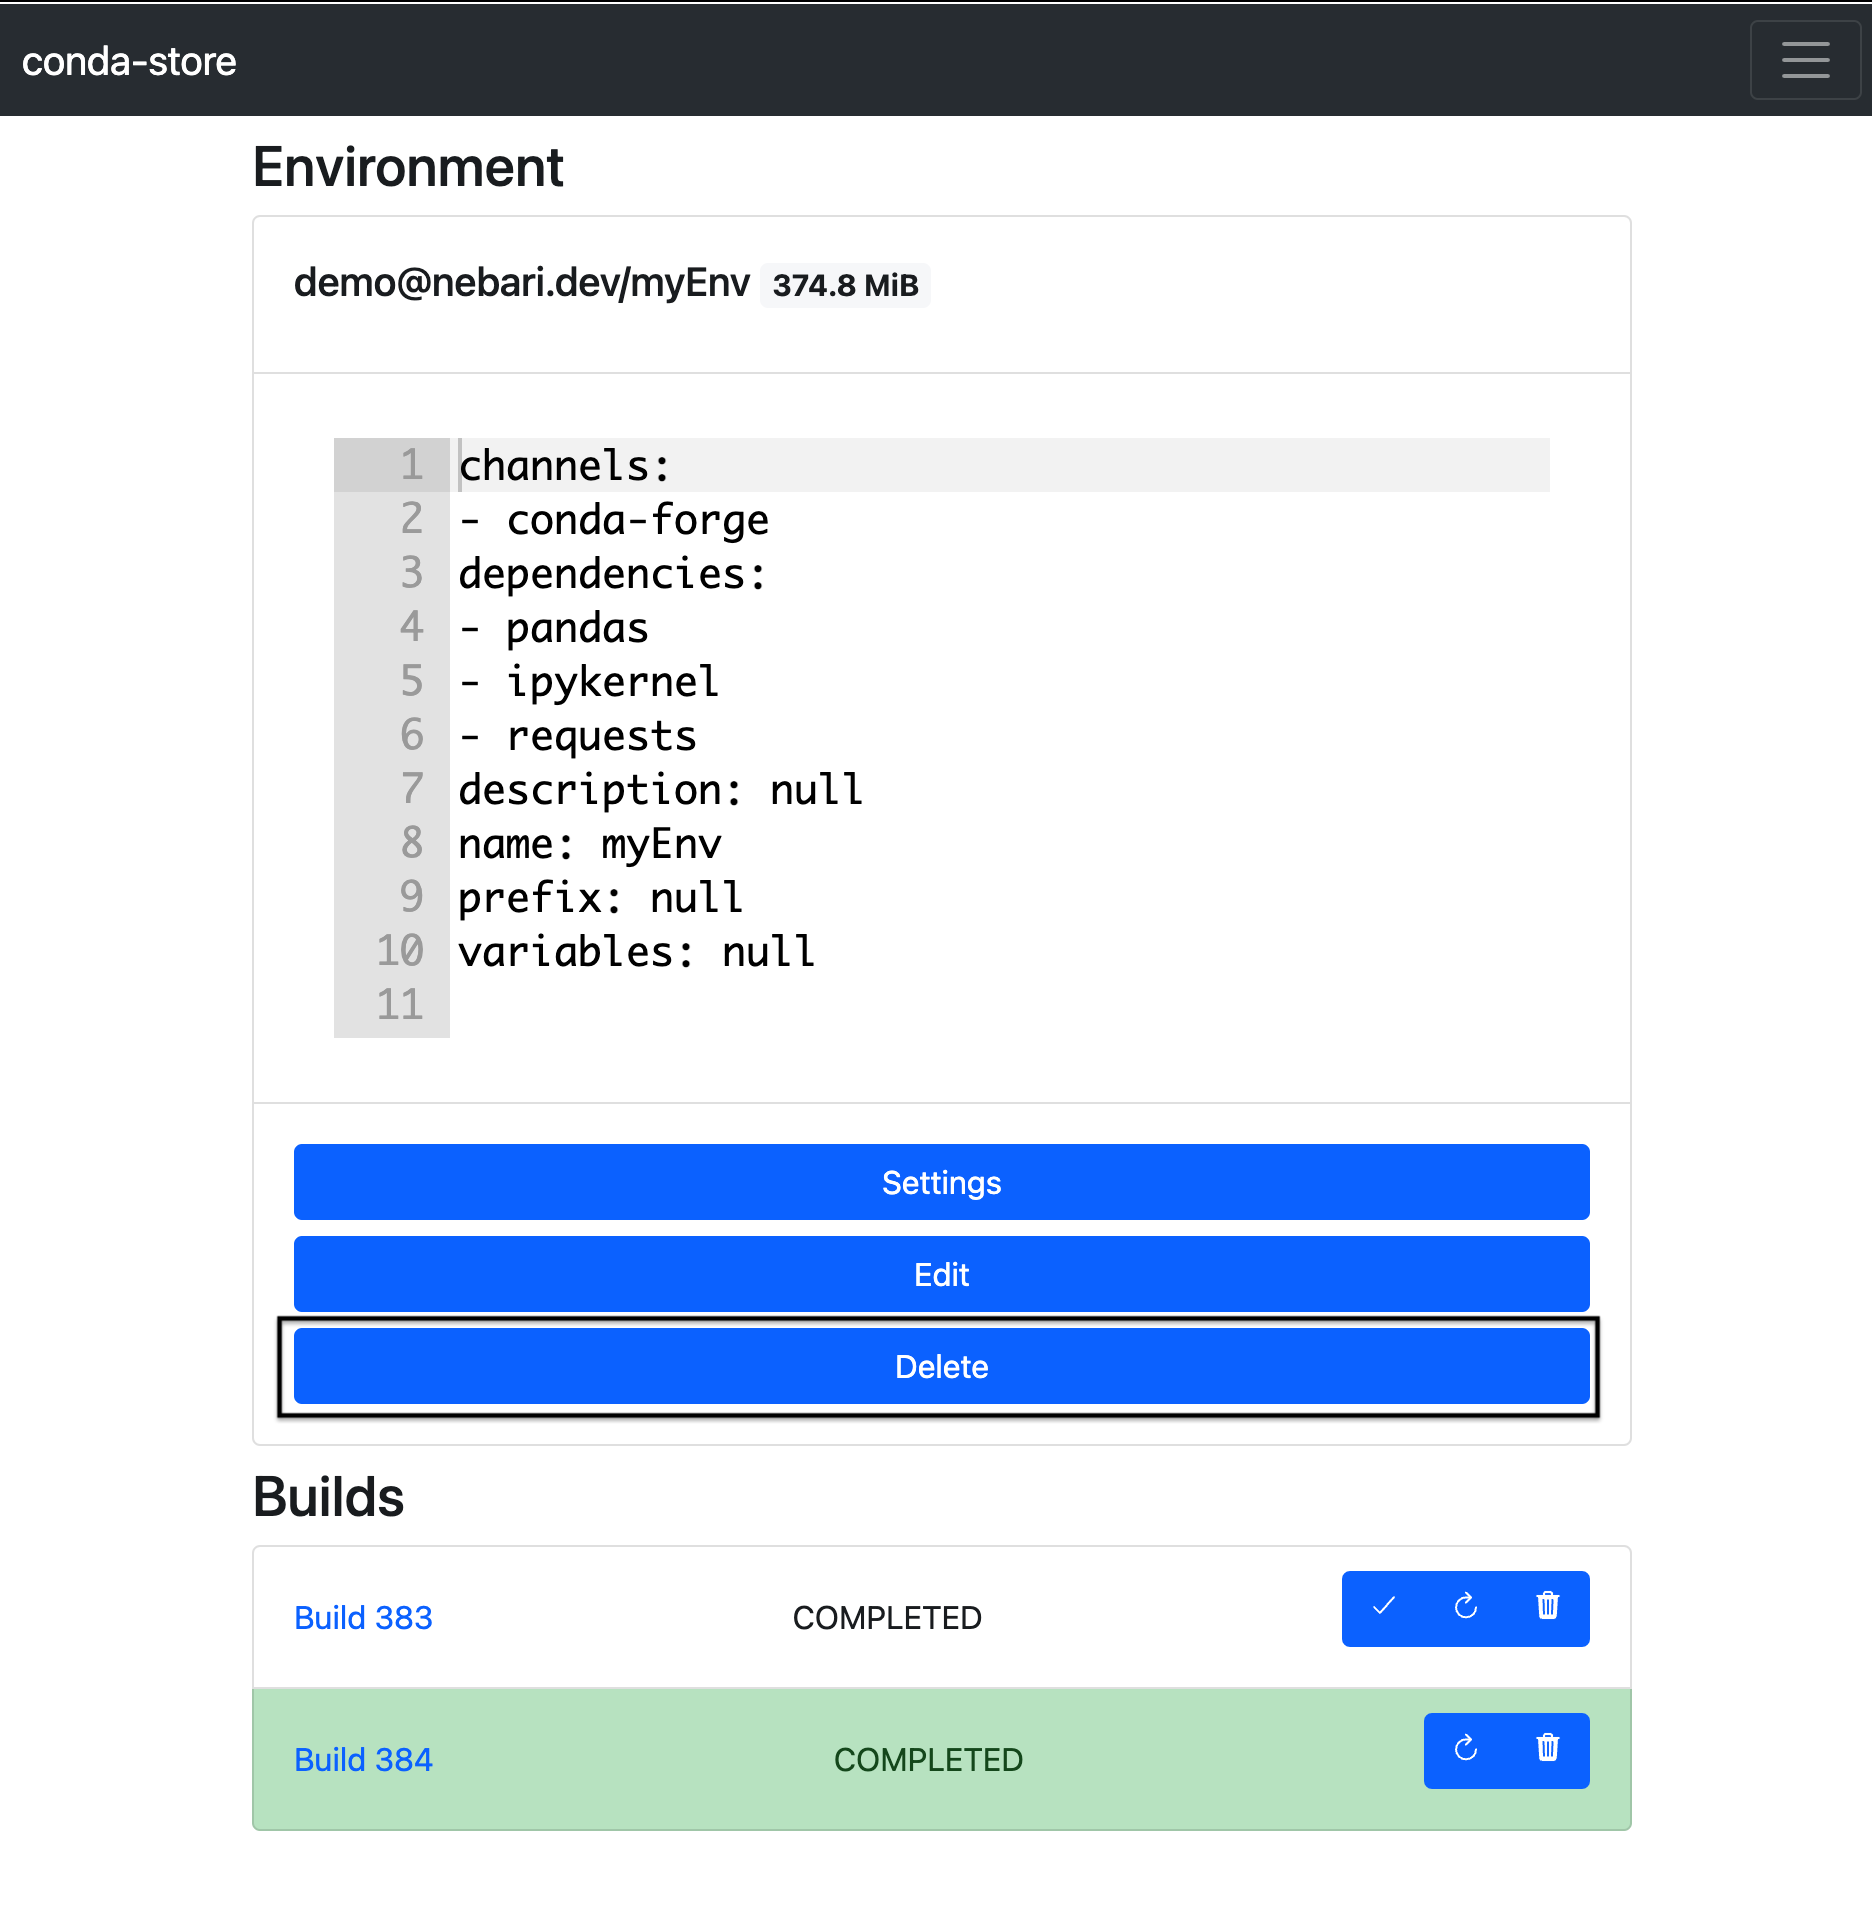
Delete a conda-store environment
If you wish to delete a conda-store environment, your user will need the conda_store_admin (in the admin group) or conda_store_superadmin
(in the superadmin group) role to be perform this action.
The steps to delete an environment are practically the same:
- Navigate to https://your-nebari-domain/conda-store/admin/ and login
- Navigate to the appropriate conda-store namespace and environment
- When ready, click on the "delete" button
Delete a conda-store namespace
If you wish to delete a conda-store namespace, your user will need the conda_store_superadmin (in the superadmin group) role to be perform this action.
- Navigate to https://your-nebari-domain/conda-store/admin/user and login
- Click on the "Manage namespaces" button

- Find the namespace you wish to delete and click on the "delete" button
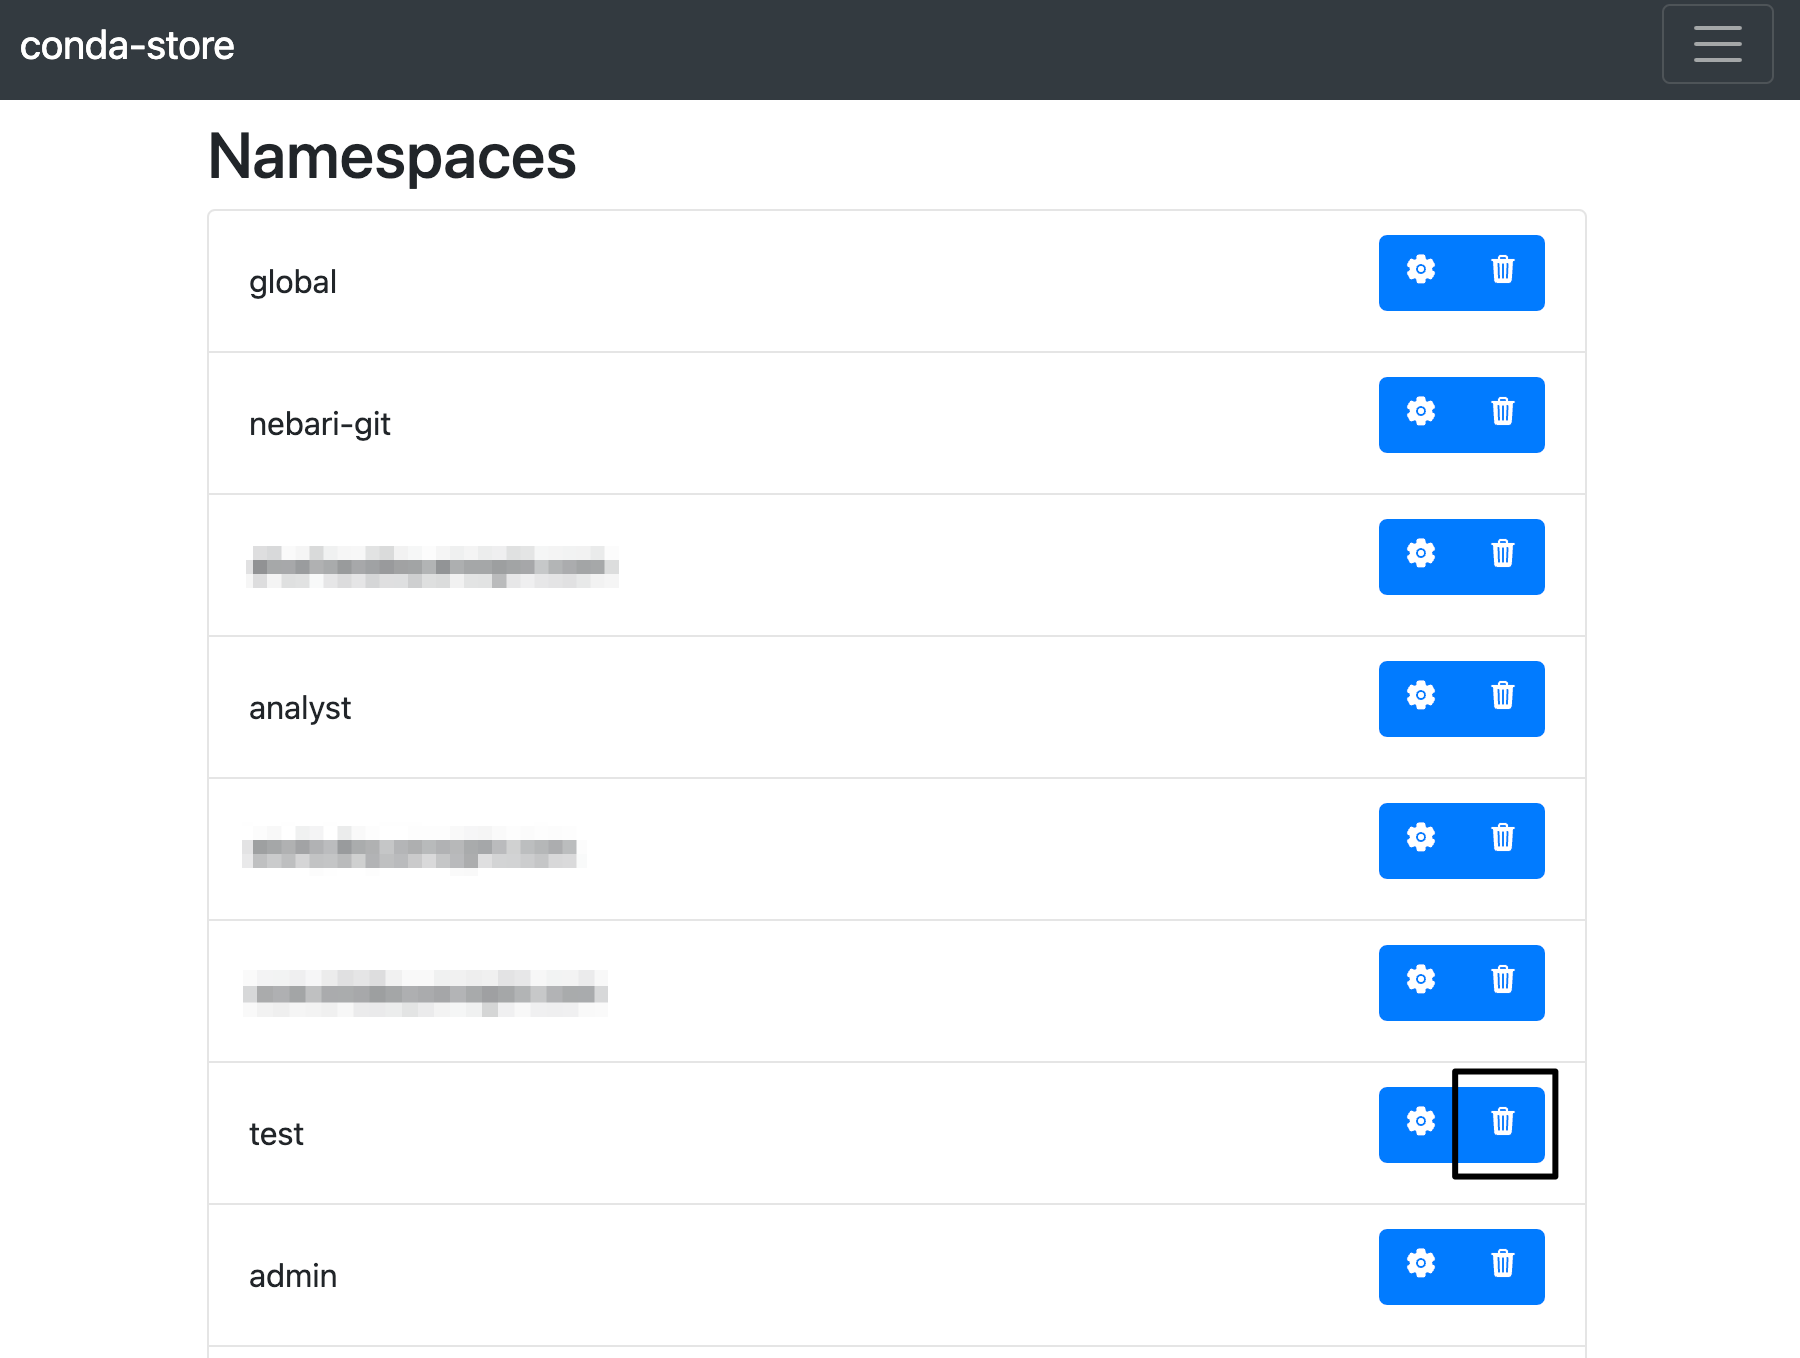
Please avoid deleting the nebari-git namespace as it is used by the base JupyterLab image and deleting it will likely cause JupyterLab to stop working!
Conda-store compatibility migration steps when upgrading to 0.4.5
If you are upgrading from a version of Nebari prior to 0.4.5, you will need to manually update your conda-store namespaces
to be compatible with the new Nebari version. This is a one-time migration step that will need to be performed after upgrading to continue using the service.
After upgrading to 0.4.5, the base names for the following namespaces that are built in with Nebari were changed as follows:
default->globalfilesystem->nebari-git
Due to this change, you will need to migrate the environments from the old default and filesystem namespaces into the new global and nebari-git respectively.
This is a manual process that consists in copying over the yaml specifications for each environment to the new namespaces and rebuilding them.
Once all environments are migrated, you will be able to delete the default and filesystem namespaces using the delete option from the conda-store UI:
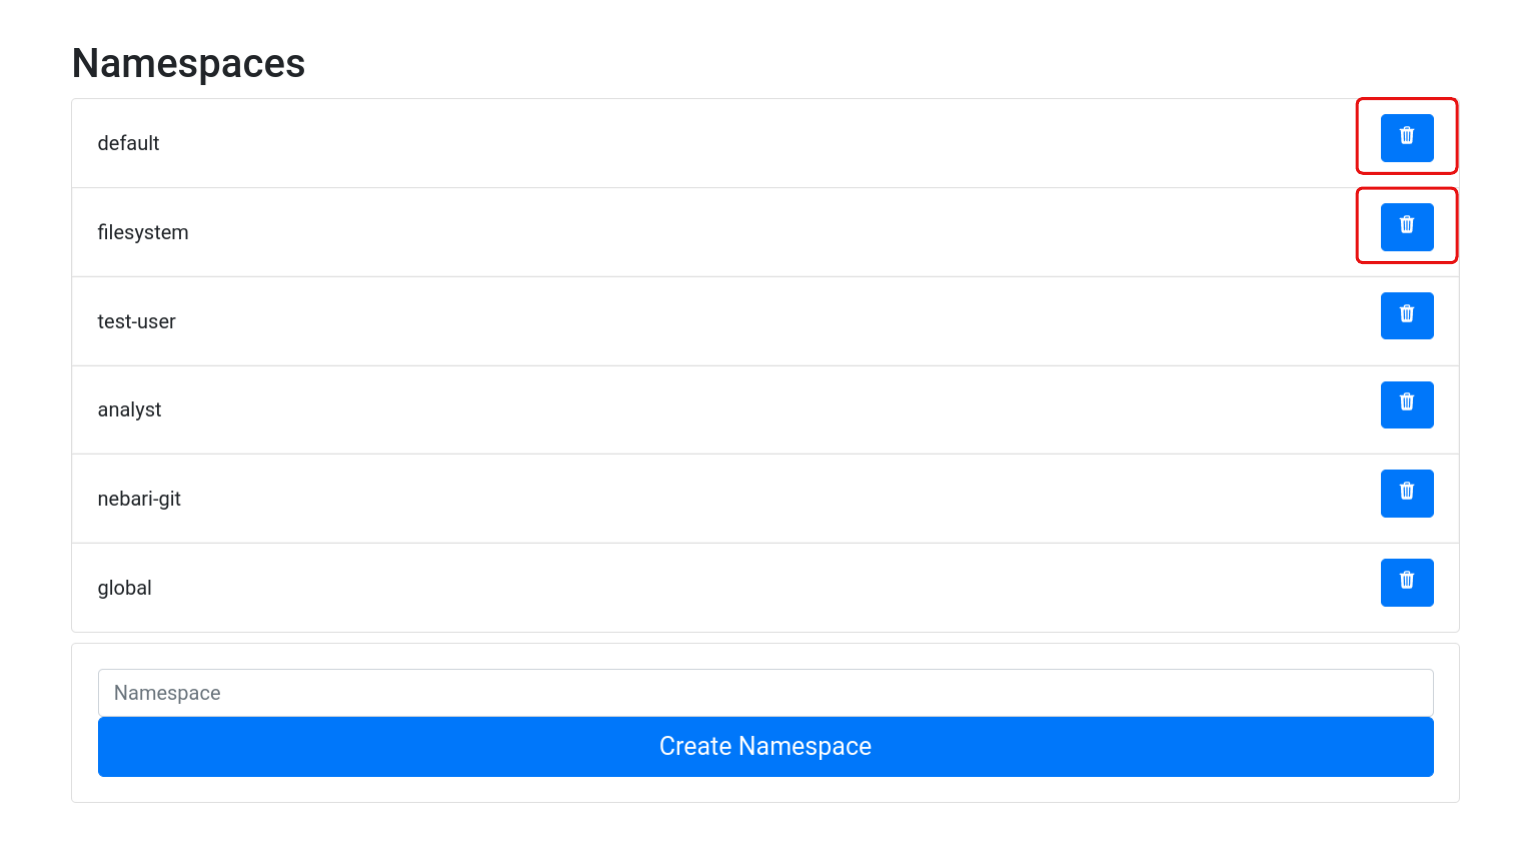
Both the filesystem and nebari-git are built-in namespaces that are used by Nebari.
Deleting or modifying these namespaces will require special permission levels that are not granted by default.
Follow the instructions in the Handle Access to restricted namespaces to grant the necessary permissions.
Required pins for Dask environments
There are some pins that are required for the Nebari Dask environment to function correctly.
The best way to manage Dask pins is to use the nebari-dask
metapackage on conda-forge.
Usage will look something like this:
environments:
  environment-dask.yaml:
    name: dask
    channels:
    - conda-forge
    dependencies:
    - python
    - ipykernel
    - ipywidgets
    - nebari-dask ==0.2.3
The pins for the metapackage can be found in the conda-forge recipe.
SSL certificate issues with ClearML
If you are using ClearML and you are getting SSL certificate errors, this might be due to a mismatch between the certificate used by ClearML and the one used by Nebari. This normally happens when a custom certificate was provided to Nebari that does not englobe the ClearML domains, which are:
- files.clearml.<nebari-domain>
- app.clearml.<nebari-domain>
- api.clearml.<nebari-domain>
If the Domain Name System (DNS) and Common Name (CN) name doesn't match, Traefik then generates and uses a self-signed certificate. Though as it's not possible to request a double wildcard certificate for a domain (for example *.*.local.com). This may lead to some unexpected TLS issues, so as alternative to including each specific domain under the certificate CN list, you may also define a wildcard certificate. See default certificate configuration for more details.
Errors
Default conda-store environment fails to build on initial deployment
One of the two conda-store environments created during the initial Nebari deployment (dashboard or dask) may fail to appear as options when logged into JupyterHub.
If your user has access to conda-store, you can verify this by visiting <your_nebari_domain>.com/conda-store and having a look at the build status of the missing environment.
The reason for this issue is how these environments are simultaneously built. Under the hood, conda-store relies on Mamba/Conda to resolve and download the specific packages listed in the environment YAML. If both environment builds try to download the same package with different versions, the build that started first will have their package overwritten by the second build. This causes the first build to fail.
To resolve this issue, navigate to <your_nebari_domain>.com/conda-store, find the environment build that failed and trigger it to re-build.
DNS domain={{ your_nebari_domain }} record does not exist
During your initial Nebari deployment, at the end of the 04-kubernetes-ingress stage, you may receive an output message stating that the DNS record for your_nebari_domain "appears not to exist, has recently been updated, or has yet to fully propagate."
As the output message indicates, this is likely the result of the non-deterministic behavior of the DNS.
Without going into a deep dive of what DNS is or how it works, the issue encountered here is that when Nebari tries to look up the IP address associated with the DNS record, your_nebari_domain, nothing is returned. Unfortunately, this "lookup" is not as straightforward as it sounds. To lookup the correct IP associated with this domain, many intermediate servers (root, top level domain, and authoritative nameservers) are checked, each with their own cache, and each cache has its own update schedule (usually on the order of minutes, but not always).
As the output message mentions, it will ask if you want it to retry this DNS lookup again after another wait period; this wait period keeps increasing after each retry. However, it's possible that after waiting 15 or more minutes that the DNS still won't resolve.
At this point, feel free to cancel the deployment and rerun the same deployment command again in an hour or two. Although not guaranteed, it's likely that the DNS will resolve correctly after this prolonged wait period.
If you are interested in learning more about DNS, this "How DNS works comic" by dnsimple is a great resource to get started.
New Dask Gateway clusters lead to 500 Internal Server Error
This may occur when dask-gateway-controller has some internal authentication issues. To resolve this, you can restart nebari-daskgateway-controller and nebari-daskgateway-controller pods:
- Open
k9s(Learn more aboutk9sin Debug Nebari deployment) - Press the / key and search for "daskgateway"
- Use the arrow keys to highlight each pod
- Delete highlighted pods with ctrl + d, and the pods should restart automatically
Conda-store storage threshold
Nebari has a predefined (and configurable) storage limit for private and shared conda environments created via conda-store. A common pitfall is having the created environments fill up the available space, resulting in the following error in the conda-store UI when trying to create new environments or builds:
CondaStore.storage_thresholdreached
To remove unused or unwanted environments and free up some space, you can follow the Delete a conda-store build, environment or namespace steps.
While this process does indeed free up space in the storage drive, currently trying to create a new environment or build using the conda-store UI keeps failing because it does not re-scan available space automatically. In order to have conda-store re-scan the available space and allow the creation of new environments and builds, the conda-store worker pod must be restarted.
You can do this via either k9s or kubectl.
If you prefer kubectl, simply run:
kubectl delete pods -l role=nebari-conda-store-worker -n dev
Make sure to change dev if you specified a different namespace in the configuration.
If you prefer k9s:
- Open
k9s(Learn more aboutk9sin Debug Nebari deployment) - Press the / key and search for "nebari-conda-store-worker"
- Use the arrow keys to highlight each pod
- Delete highlighted pods with ctrl + d
In both cases, a new conda-store worker pod will be immediately restarted, and you will be able to create new environments and builds again.
How do I...?
Get the Kubernetes context
Depending on a variety of factors, kubectl may not be able to access your Kubernetes cluster.
To configure this utility for access, depending on your cloud provider:
- Google Cloud
- Amazon AWS
Check the Google Cloud Platform documentation for more information.
-
Download the GCP SDK.
-
Initialize the gcloud CLI with
gcloud init. This will prompt you to log in to your GCP account. -
Fetch your cluster credentials with:
gcloud container clusters \
  get-credentials "<your-cluster-name>" \
  --region "<region>"
Check the Amazon Web Services documentation for more information.
- Download the AWS CLI.
- If you haven't already, create an AWS Access Key and Secret Key.
- Create a
kubeconfigfile with:
aws eks update-kubeconfig --region "<region-code>" \
  --name "<your-cluster-name>"
Once you have created a kubeconfig file kubectl should be able to access your Kubernetes cluster.
Deploy an arbitrary pod
A straightforward way to deploy arbitrary pods would be to use kubectl apply on the pod manifest.
Upgrade the instance size for the general node group
The general node group, or node pool, is (usually) the node that hosts most of the pods that Nebari relies on for its core services: hub, conda-store, proxy and so on.
The instance by default, follows a "min-max" approach to determine the instance size: large enough so that the initial deployment will work out of the box,
while keeping total cloud compute costs to a minimum.
Although each cloud provider has different names and hourly prices for their compute nodes, the default general node group in nebari-config.yaml has 2 vCPU and 8 GB of memory.
Based on testing, clusters running on Google Kubernetes Engine (GKE) appear to be amenable to in-place upgrades of the general node instance size.
Unfortunately, this does not seem to be the case with the other cloud providers, and attempting to do so for AWS and Azure will likely result in the catastrophic destruction of your cluster.
| Cloud Provider | general node upgrade possible? |
|---|---|
| AWS | No (Danger!) |
| Azure | No (Danger!) |
| GCP | Yes |
If modifying the resource allocation for the general node in-place is absolutely necessary, try increasing the maximum number of nodes for the general node group.
This will mean two nodes (reserved for the general node group) will always be running, ultimately increasing the operating cost of the cluster.
Given the possible destructive nature of resizing this node group, it is highly recommended to back up your cluster before attempting this.
Alternatively, you can backup your cluster, destroy it, specify the new instance size in your nebari-config.yaml, and redeploy.
Use a DNS provider other than CloudFlare
CloudFlare is one of the most commonly used DNS providers for Nebari, so to some it may seem as if it is the only DNS provider Nebari supports. This is not the case.
The Setup Nebari domain registry section in these docs contain detailed instructions on how to change or set a new DNS provider.
Add system packages to a user's JupyterLab image
In some cases, you may wish to customize the default user's JupyterLab image, such as installing some system packages via apt (or other OS package manager) or adding some JupyterLab extensions.
Nebari uses its own registered docker images for jupyterhub, dask, and jupyterlab services by default, but this can be changed by:
- Building your own docker images, and
- Including the DockerHub register hash into
nebari-config.yaml.
Provide individual users with unique environments and cloud instance types
Nebari allows for admins to set up user groups which each have access to specific environments and server instance types. This allows for a fine-tuned management of your cloud resources. For example, you can create a special user group for a team of ML engineers which provides access to GPUs and a PyTorch environment. This will prevent inexperienced users from accidentally consuming expensive resources. Provided you have performed some setup ahead of time, users can choose both instance types as well as environments at server launch time.
First, you will need to create new node groups, one for each type of GPU instance you would like to provide users.
Second, you will need to create a new JupyterLab profile to select the GPU node. In this way, you'll have a separate profile for GPUs which users can select.
Migrate existing environments from a namespaces to another
When you create a new environment as a user, it requires selecting a namespace. This namespace is used to identify the group permissions to that environment and the location where the environment needs to be stored. To migrate environments from one namespace to another, you must manually build all environments in the new namespace. Once migrated, you can delete the old namespace, permanently deleting all existing environments built against it.
Handle Access to restricted namespaces
The built in namespace nebari-git is used to build the environments from the nebari-config.yaml file.
As its use is reserved for conda-store server, and is directly controlled by Nebari, modifying or deleting the contents of such namespaces without system permission level
will result in a permission denied message from conda-store.
As the conda-store system permission level is not granted to any user on Nebari, to modify this namespace, you will need to manually update the conda-store-config.py configmap located in the
kubernetes cluster to lift the restriction. Follow the steps below to do so: (kubectl or k9s are required)
With kubectl:
kubectl edit configmap conda-store-config -n nebari
Once the editor opens, look for the role_bindings map and update
the default_namespace value from {"viewer"} to {"admin"}. And restart the conda-store
pods to fully propagate the changes.
With k9s:
- Type :configmap to list the available configmaps.
- Search for
conda-store-configusing the shortcut /conda-store-config. - When hovering over the
configmap, press e to open the editor. (defaults tovim) - Look for the
role_bindingsmap and update thedefault_namespacevalue from{"viewer"}to{"admin"}. - Save and exit the editor. (
:wq) - Restart the conda-store pods to fully propagate the changes.
Based on the Nebari and conda-store security model, the default_namespace value should be set to {"viewer"} after the migration is complete. Or followed by a re-deployment of Nebari
to restore the default value.